Changing a pool light bulb yourself is a manageable task if you prioritize safety and follow proper steps. Always start by cutting power at the breaker to prevent electrocution, then carefully remove the fixture, replace the bulb and gasket, and re-seal everything securely. Taking your time and paying attention to detail ensures a safe and successful bulb replacement, bringing light back to your swimming pool.
Having a well-lit swimming pool transforms your evening swims, enhancing both ambiance and safety. There’s something truly magical about a softly glowing pool inviting you in after a long day. But what happens when that welcoming glow flickers, dims, or worse, disappears entirely? Often, the culprit is simply a burnt-out pool light bulb, and the good news is that changing a pool light bulb is a task many homeowners can tackle themselves with a little patience and the right know-how.
Now, before we dive in, let’s be crystal clear: we’re dealing with electricity and water, which means safety isn’t just important—it’s absolutely critical. This isn’t a job to rush or take lightly. But with a methodical approach, you can successfully replace your pool light bulb, save money on a service call, and enjoy a bright, beautiful pool once again. Think of this guide as your trusted friend walking you through each step, ensuring you stay safe and confident throughout the process.
Let’s get that pool sparkling again! Here’s everything you need to know about how to change a pool light bulb, from gathering your gear to that satisfying moment when the light clicks back on.
Key Takeaways
- Safety is Paramount: Always, without exception, turn off the power to your pool light at the circuit breaker before attempting any work. Water and electricity are a deadly combination.
- Identify Your Bulb Type: Determine if you have an incandescent or LED bulb and understand your fixture type (niche vs. nicheless) before purchasing a replacement to ensure compatibility.
- Essential Tools Are Key: Gather necessary tools like screwdrivers, a new gasket, a new bulb, and possibly a non-metallic pry tool before you begin to streamline the process.
- Gasket Replacement is Crucial: The integrity of the gasket is vital for preventing water intrusion. Always inspect or ideally replace the gasket when changing a pool light bulb.
- Test for Leaks Carefully: After installing the new bulb and re-sealing the fixture, test it in shallow water or on the pool deck before fully submerging to check for any leaks.
- Don’t Be Afraid to Call a Pro: If you encounter persistent issues, suspect electrical problems, or simply feel uncomfortable, hiring a licensed pool technician is always a safe and wise choice.
Quick Answers to Common Questions
Do I need to drain my pool to change the light bulb?
Not usually. Most pool light fixtures have enough cord slack to be pulled onto the pool deck or steps for servicing without draining the pool. You may only need to lower the water level slightly if the cord is short.
How often should I change my pool light gasket?
It is highly recommended to replace the gasket every time you change a pool light bulb. Gaskets can become brittle and lose their sealing ability over time, leading to leaks.
Can I replace an incandescent pool light bulb with an LED one?
Yes, often you can! Many LED pool light bulbs are designed as direct replacements for incandescent bulbs in existing fixtures. Just ensure the LED bulb matches the voltage (12V or 120V) and wattage compatibility of your fixture.
What should I do if my GFCI trips after changing the bulb?
If your GFCI (Ground Fault Circuit Interrupter) trips, it’s a strong indication of a short circuit or water intrusion. Immediately turn off the power, remove the fixture, and carefully inspect the gasket and seal. Do not ignore a tripping GFCI, as it signifies a safety hazard.
What tools do I need to change a pool light bulb?
You’ll typically need screwdrivers (Phillips and possibly flathead), a new pool light bulb, a new gasket, and possibly a non-metallic pry tool. A voltage tester is also recommended for safety verification.
📑 Table of Contents
Safety First: Essential Precautions Before You Start
Alright, buddy, this is the most important part of the whole operation. Seriously, read this section twice. Working with electricity and water is no joke, and your safety is our top priority. Before you even think about touching that pool light fixture, you MUST take these precautions.
Turning Off the Power
This is the cardinal rule. You absolutely, positively must cut power to your pool light. Don’t just flip a wall switch; go straight to your main electrical panel, usually found in your garage, basement, or utility room.
- Locate the Breaker: Find the circuit breaker specifically labeled for your “Pool Light,” “Pool Equipment,” or similar. If it’s not clearly marked, you might need to flip breakers one by one until the pool light goes out (if it’s currently on). If you’re unsure, it’s safest to turn off the main breaker for your entire pool system or even the main breaker for your house, especially if you have an older panel.
- Verify No Power: Once you’ve flipped the breaker to the “OFF” position, double-check that the light is indeed off. If possible, use a non-contact voltage tester near the light fixture (even underwater if accessible) to confirm there’s no live current. This simple step can literally save your life.
- GFCI Outlets: Many pool systems are protected by Ground Fault Circuit Interrupter (GFCI) outlets. While these offer an extra layer of safety, they are not a substitute for turning off the main breaker. The GFCI might trip if there’s an issue, but you still need to cut the primary power supply at the panel.
Understanding Water and Electricity
You know the drill: water conducts electricity, and your body is a pretty good conductor too. Any accidental contact with live wires while standing in or near water can be fatal. By cutting the power at the source, you eliminate this risk. Never assume a light is off just because it looks off. Always verify.
Gathering Your Tools and Supplies
Before you start, gather everything you’ll need. This prevents frustrating trips back and forth and keeps your focus on the task at hand.
- New Pool Light Bulb: Ensure it’s the correct type and wattage for your fixture. We’ll talk more about this below.
- New Gasket/Seal: This is CRUCIAL. The gasket keeps water out of the fixture. Always replace it when changing a pool light bulb, as old ones can become brittle and ineffective.
- Screwdrivers: You’ll likely need a Phillips head and possibly a flathead to remove the fixture screws.
- Wire Cutters/Strippers (Optional): Only if you need to re-splice wires, which is rare for a simple bulb change.
- Non-Metallic Pry Tool: Sometimes the fixture cover can be a bit stubborn. A plastic putty knife or trim removal tool can help without scratching.
- Safety Gloves: Protect your hands.
- Towel or Rag: For drying the fixture.
- Dielectric Grease (Optional but Recommended): A small amount applied to the gasket can help create a better seal and prevent sticking.
- Voltage Tester: For verifying power is off.
Identifying Your Pool Light Type and Bulb
Not all pool lights are created equal. Before you buy a replacement, you need to know what you’re working with. This will save you time, money, and frustration.
Incandescent vs. LED Bulbs
The biggest decision point these days is often between these two types.
- Incandescent Bulbs: These are the traditional screw-in bulbs, much like older household bulbs. They are typically cheaper upfront but consume more electricity and have a shorter lifespan (around 1,000-5,000 hours). They produce a warm, yellowish light. If your current bulb looks like a standard oversized light bulb, it’s likely incandescent.
- LED Bulbs: Light Emitting Diode (LED) bulbs are a modern upgrade. They are more expensive initially but are incredibly energy-efficient, last much longer (20,000-50,000 hours or more), and often offer a wider range of colors and light effects. Many LED pool light bulbs are designed to be retrofitted into existing incandescent fixtures. If your current light offers multiple colors or has a distinct array of small lights, it’s probably LED.
Tip: Consider upgrading to an LED pool light bulb if you currently have an incandescent. The energy savings and longevity often make the initial investment worthwhile. Make sure the LED bulb you choose is compatible with your existing fixture and transformer (if applicable).
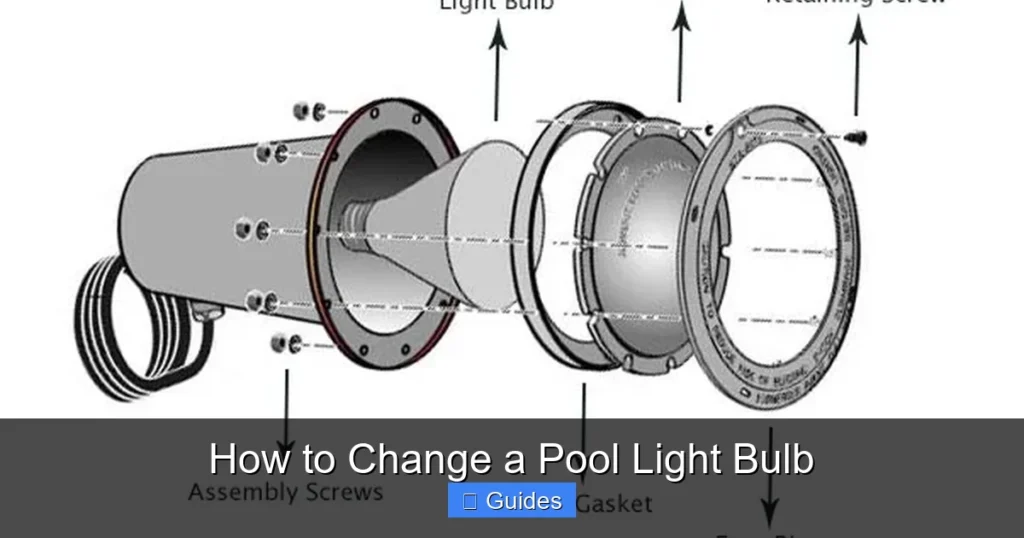
Visual guide about How to Change a Pool Light Bulb
Image source: pondsinfo.com
Fixture Types (Niche vs. Nicheless)
How your light is mounted affects how you access it.
- Niche Lights: These are the most common type. The light fixture sits inside a recessed “niche” in the pool wall. The fixture itself is usually held in place by a single screw at the top, allowing it to be pulled out of the niche for servicing.
- Nicheless Lights: These are newer, often smaller lights that mount flush with the pool wall. They don’t have a large, recessed housing. Accessing the bulb can sometimes be more involved, potentially requiring partial draining of the pool or specialized tools, though many are designed for easier servicing from the deck.
For the purpose of this guide, we’ll focus primarily on niche lights, as they are the most common and homeowner-serviceable for bulb changes. If you have a nicheless light and aren’t sure how to access it, consulting your pool’s manual or a professional is advisable.
Checking Bulb Specifications
Once you’ve determined the type, you need the specifics.
- Wattage: This is crucial. Your new pool light bulb must match the wattage of the old one or be within the safe range specified by your fixture. Over-wattage can damage the fixture or wiring.
- Voltage: Most pool lights are 12V or 120V. This is determined by your pool’s transformer (if 12V) or directly from your home’s electrical system (if 120V). Check the existing bulb or the fixture’s label. Mixing voltages can be dangerous.
- Base Type: Most standard incandescent pool light bulbs use an Edison screw base (E26/E27), similar to regular household bulbs. Some specialized LED pool light bulbs might have proprietary connections or pins.
Always try to get the exact make and model number from your old bulb or fixture if you can. If not, take a picture or carefully note down all the specifications printed on the bulb itself.
Step-by-Step Guide to Changing Your Pool Light Bulb
Okay, you’ve powered down and gathered your gear. Now for the main event! Follow these steps carefully to ensure a smooth and safe replacement.
Accessing the Fixture
This is where the method can vary slightly depending on your specific pool setup.
- Lowering the Water Level (Sometimes Necessary): For many pool light bulbs, you don’t need to drain the entire pool. Most fixtures have enough slack in their electrical cord (usually around 8-10 feet) to be pulled up onto the pool deck or steps. However, if your fixture has a shorter cord, or if you simply prefer to work completely dry, you might need to lower your pool’s water level a few inches or even a foot below the light fixture. Use your pool pump’s “waste” or “backwash” setting for this, or a submersible pump.
- Removing the Fixture Screw: Locate the single screw at the very top of your light fixture’s rim. This screw holds the entire assembly into the niche. Use the appropriate screwdriver (usually Phillips head) to loosen and remove this screw. Keep it in a safe place!
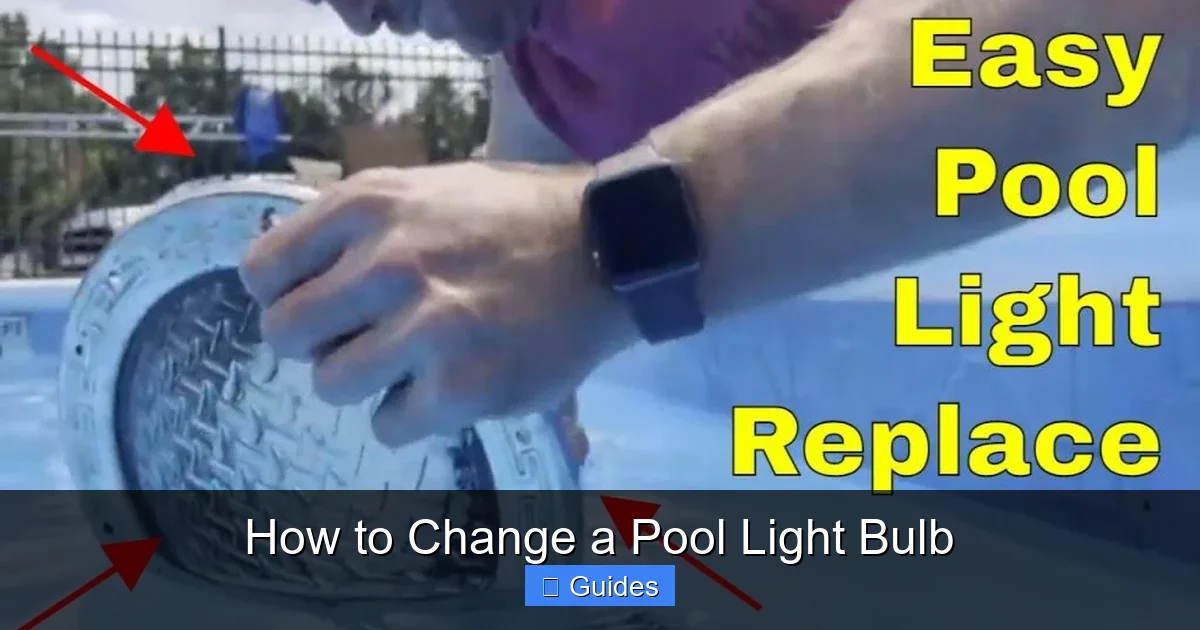
- Pulling Out the Fixture: Gently pull the light fixture assembly out of its niche. You should feel the cord slack as you pull. Carefully bring the entire unit up onto the pool deck or a stable step. Be mindful not to damage the cord as you pull. Rest the fixture somewhere stable where it won’t fall back into the pool.
Removing the Old Bulb
With the fixture safely out of the water and resting on the deck:
- Open the Lens Cover: The light fixture is usually a sealed unit. It typically has several screws (often 4-8) around the perimeter of the faceplate or lens cover. These screws hold the clear lens and the gasket in place. Carefully remove all of these screws.
- Detach the Lens and Gasket: Once the screws are out, the lens cover should come off. You might need a non-metallic pry tool (like a plastic putty knife) to gently separate it if it’s stuck due to the old gasket. As you remove the lens, the old gasket will either come off with it or remain in the fixture housing.
- Unscrew the Old Bulb: Inside, you’ll see the old pool light bulb. It will likely be a standard screw-in type. Unscrew it counter-clockwise, just like you would a household light bulb. If it’s stiff, try to get a good grip (wearing gloves helps). Dispose of the old bulb properly.
Inspecting and Replacing the Gasket
This step is critical for preventing leaks and is often overlooked.
- Inspect the Old Gasket: Look closely at the old gasket. Is it cracked, brittle, flattened, or torn? Any sign of wear means it’s compromised.
- Always Replace: Even if it looks okay, it’s highly recommended to replace the gasket every time you change a pool light bulb. New gaskets are inexpensive, and they are your primary defense against water intrusion which can short circuit the bulb and even damage the fixture.
- Clean the Gasket Channel: Before installing the new gasket, clean the channel where the gasket sits. Remove any debris, old sealant, or grit. A clean surface ensures a proper seal.
- Apply Dielectric Grease (Optional): A thin, even layer of dielectric grease on the new gasket can help improve the seal, prevent the gasket from sticking, and make future servicing easier. Just a little bit will do.
- Install the New Gasket: Carefully fit the new gasket into its channel, ensuring it’s seated perfectly without any twists or pinches. It should lie flat and smoothly.
Installing the New Bulb
This is the satisfying part!
- Screw in the New Bulb: Take your new pool light bulb and carefully screw it into the socket, turning clockwise until it’s snug. Do not overtighten, as this can damage the socket or the bulb. Just make it firm.
- Clean the Lens: Before reattaching, quickly wipe the inside and outside of the lens cover to remove any fingerprints or smudges. A clean lens ensures maximum light output.
Re-sealing and Reinstalling the Fixture
Now we’re putting everything back together securely.
- Reattach the Lens Cover: Carefully place the lens cover back onto the fixture, ensuring the gasket is properly seated between the lens and the fixture body.
- Secure the Screws: Reinsert all the perimeter screws that hold the lens cover in place. Tighten them in a crisscross pattern, like tightening lug nuts on a car tire. This helps ensure even pressure and a watertight seal. Tighten them firmly but avoid over-tightening, which can crack the lens or strip the screw holes.
- Submerge and Reinstall: With the fixture now re-sealed and the new pool light bulb installed, carefully lower the entire fixture back into the pool. Guide it back into its niche, ensuring the cord doesn’t get tangled or pinched. Align the fixture with the screw hole at the top of the niche.
- Secure the Fixture Screw: Reinsert the single top screw that holds the fixture in the niche and tighten it securely.
Testing Your New Pool Light
You’re almost there! It’s time to see if your hard work paid off.
Initial Power Up
Go back to your electrical panel and flip the circuit breaker for your pool light back to the “ON” position. Come back to the pool and check if the light comes on. If it does, fantastic! If it’s an LED bulb with multiple colors, test out the different settings if applicable.
Leak Detection
This is a critical step, especially if you had to replace the gasket.
- Visual Inspection: With the light on, visually inspect the area around the light fixture, both from inside the pool and from the deck, for any signs of bubbles escaping from the fixture. Bubbles indicate a leak.
- Manual Check: Reach down and feel around the edge of the lens cover for any moisture. This is easiest if the water level is low enough.
- Monitor for a Few Days: Even if you don’t see immediate leaks, keep an eye on your pool’s water level and the light for the next few days. A small, slow leak might not be immediately obvious.
If you detect a leak, immediately turn off the power, remove the fixture, and re-examine the gasket. It might be pinched, twisted, or improperly seated. Repeat the re-sealing process with extra care.
Troubleshooting Common Issues
Sometimes things don’t go perfectly the first time. Don’t worry, here are a few things to check:
- Light Doesn’t Turn On:
- Is the breaker fully “ON”?
- Is the bulb screwed in tightly enough?
- Is the new bulb defective? (It happens!)
- Is there power to the fixture? (Use your voltage tester, but only if you are absolutely sure it’s safe and you know how to use it).
- Could there be an issue with the GFCI outlet tripping?
- Light Flickers or Is Dim:
- Check the bulb connection.
- Ensure the wattage is correct for the fixture.
- Could be a loose wire connection within the fixture (if you had to re-splice, which is rare for a bulb change).
- GFCI Trips:
- This is a major red flag for a short circuit or ground fault. Immediately turn off the power.
- A leak allowing water into the fixture is the most common cause. Re-check your gasket and seal.
- Could be a damaged wire or socket.
- Do NOT ignore a tripping GFCI. This indicates a serious electrical safety hazard.
When to Call a Professional
While changing a pool light bulb is a DIY-friendly task for many, there are definitely times when it’s best to call in the experts. Don’t hesitate to do so if you encounter any of these situations. Your safety and your pool’s longevity are worth it.
Persistent Leaks or Electrical Problems
If you’ve re-sealed your fixture carefully, replaced the gasket, and you’re still getting water inside, or if your GFCI continues to trip, it’s time for a pro. These symptoms can indicate a more serious issue than just a faulty bulb or gasket, such as a cracked fixture housing, damaged wiring, or an issue with the conduit. An experienced pool technician can accurately diagnose and repair these problems.
Outdated or Damaged Wiring
When you open up the fixture, if you notice any frayed, cracked, or exposed wiring, or if the internal components look corroded or severely deteriorated, stop immediately. Attempting to repair old or damaged wiring, especially near water, is extremely dangerous without proper training and equipment. A professional electrician or pool technician can assess the wiring’s integrity and perform necessary repairs or upgrades safely.
Comfort Level and Expertise
Honestly, if at any point you feel uncomfortable, unsure, or out of your depth, that’s your cue to call a professional. There’s no shame in knowing your limits. Pool electrical systems can be complex, and ensuring everything is up to code and perfectly safe is paramount. A licensed and insured professional will have the expertise, specialized tools, and knowledge of local electrical codes to handle the job safely and effectively, giving you peace of mind.
Changing a pool light bulb can be a rewarding DIY project, but always remember that safety comes first. If in doubt, call a pro!
Now go enjoy your beautifully lit pool!
🎥 Related Video: Replace a Swimming Pool light Underwater Video
📺 Rosco Reviews
Link for LED color changing pool Light bulb: https://amzlink.to/az0cRTuirYcxy Link for Pool Light Gaskets for pentair: …
Frequently Asked Questions
How long does a pool light bulb typically last?
The lifespan of a pool light bulb varies significantly by type. Traditional incandescent bulbs usually last between 1,000 to 5,000 hours. LED pool light bulbs, on the other hand, are much more durable and can last upwards of 20,000 to 50,000 hours, offering significant longevity and energy savings.
Is it safe to change a pool light bulb myself, or should I hire a professional?
Changing a pool light bulb can be a DIY task if you meticulously follow safety precautions, especially turning off the power at the breaker. However, if you are uncomfortable with electrical work, encounter persistent issues like leaks or tripping GFCIs, or see damaged wiring, it’s always safest to call a qualified pool technician or electrician.
What’s the difference between 12V and 120V pool lights, and how do I know which one I have?
The voltage refers to the electrical power supplied to the bulb. 12V lights use a transformer to step down the standard household 120V electricity, offering an added layer of safety. 120V lights are connected directly to the household power. You can usually determine your bulb’s voltage by checking the markings on the old bulb or the light fixture itself.
Can I use any outdoor light bulb in my pool light fixture?
No, you cannot. Pool light bulbs are specifically designed to withstand being submerged in water and are built to stricter safety standards. Using a regular outdoor light bulb could lead to water intrusion, electrical shorts, and dangerous safety hazards. Always purchase bulbs explicitly labeled for pool or spa use.
What if my pool light fixture is really stuck and hard to remove from the niche?
If the fixture is stuck, first ensure all screws are completely removed. Sometimes, accumulated debris or corrosion can cause it to stick. Gently wiggle the fixture or use a non-metallic pry tool (like a plastic putty knife) to carefully loosen it. Avoid excessive force that could damage the fixture or its wiring. If it remains stubbornly stuck, a professional might be needed.
My new LED pool light bulb isn’t changing colors. What could be wrong?
If your new LED pool light bulb isn’t changing colors, first ensure the power supply is stable and that you’re using the correct control method (e.g., flipping the light switch on/off rapidly, remote control). Check if the bulb is fully compatible with your existing switch and transformer. Sometimes, an older or incompatible transformer can cause issues with advanced LED features. If problems persist, consult the bulb’s manual or a professional.