
Changing a brake light bulb is a straightforward DIY task that most car owners can handle with basic tools and a little patience. This comprehensive guide walks you through every step, from gathering the right bulb and tools to safely replacing the old one and testing your work, ensuring your vehicle remains safe and road-legal. Don’t let a burnt-out bulb compromise your safety – empower yourself to make this simple fix today!
How to Change Brake Light Bulb
Picture this: you’re driving along, minding your own business, and suddenly a friendly driver pulls up beside you, gesturing wildly at the rear of your car. Or maybe a police officer gives you a gentle reminder. What’s the common culprit? A burnt-out brake light bulb. It’s an easy-to-miss problem from the driver’s seat, but it’s a big deal for safety and legality.
Driving with a non-functioning brake light is not only dangerous – it significantly increases your risk of a rear-end collision – but it’s also illegal in most places, potentially leading to a ticket. But don’t fret! The good news is that learning how to change a brake light bulb is one of the most straightforward car maintenance tasks you can tackle yourself. You don’t need to be a seasoned mechanic, and you certainly don’t need to spend a fortune at a repair shop for something so simple.
This comprehensive guide is designed to empower you with the knowledge and confidence to tackle this DIY project head-on. We’ll walk you through every step, from identifying the right bulb to troubleshooting common issues, ensuring you can safely and efficiently change brake light bulb in your own driveway. Let’s get your car back in top shape and keep you safe on the road!
Key Takeaways
- Safety First: Always park on a level surface, engage the parking brake, and consider disconnecting the battery before starting work.
- Identify the Right Bulb: Consult your car’s owner’s manual or check online resources to ensure you purchase the correct replacement bulb type for your specific make and model.
- Gentle Handling: When changing the brake light bulb, avoid touching the glass part of the new bulb directly with your bare hands, as oils can create hot spots and shorten its lifespan.
- Access Varies: The method to access your taillight assembly (from inside the trunk, by removing screws from the outside, or special clips) differs significantly by vehicle model.
- Test Thoroughly: After replacing the bulb, always have a helper verify that the new brake light functions correctly before driving, checking both the brake function and possibly the running lights.
- Troubleshooting: If the new bulb doesn’t work, check the fuse box for a blown fuse specific to your brake lights, and inspect the bulb socket for corrosion or damage.
Quick Answers to Common Questions
How long does it typically take to change a brake light bulb?
For most vehicles, changing a brake light bulb takes about 15-30 minutes, especially if you have the right tools and bulb on hand. First-timers might take a bit longer as they familiarize themselves with the process.
Can I drive with one brake light out?
While you technically can, it is illegal in most places and extremely unsafe. A single non-functioning brake light significantly increases your risk of a rear-end collision, as drivers behind you may not fully understand your braking intentions.
Do I need to disconnect the car battery to change a brake light bulb?
It’s generally not strictly necessary for a simple bulb change, as you’re only working with low voltage. However, for maximum safety, especially if you’re dealing with exposed wires or feel unsure, disconnecting the negative terminal of your car battery is a good practice to prevent any accidental shorts.
How do I know what type of brake light bulb my car needs?
The best way to determine the correct bulb type is to consult your vehicle’s owner’s manual. Alternatively, you can remove the old bulb and check the number printed on its base, or provide your car’s make, model, and year to an auto parts store.
What if I touch the glass of the new bulb with my bare hands?
Touching the glass of a new incandescent bulb with bare hands can transfer oils and dirt. These oils create hot spots when the bulb heats up, leading to premature failure. If you accidentally touch it, gently wipe the bulb with a clean, lint-free cloth moistened with rubbing alcohol before installation.
📑 Table of Contents
- Why Your Brake Light Matters (and Why You Need to Change It)
- Gathering Your Tools and Supplies (What You’ll Need)
- Step-by-Step Guide: How to Change Your Brake Light Bulb
- Troubleshooting Common Issues (What If It Still Doesn’t Work?)
- When to Call a Professional (Safety First!)
- Maintaining Your Vehicle’s Lighting System (Prevention is Key)
- Conclusion
Why Your Brake Light Matters (and Why You Need to Change It)
Before we dive into the nitty-gritty of how to change brake light bulb, let’s take a moment to appreciate the unsung hero of your car’s rear end: the brake light. These seemingly simple lights play a critical role in road safety, acting as your vehicle’s primary communication system with drivers behind you.
The Critical Role of Brake Lights in Road Safety
Your brake lights serve one fundamental purpose: to signal to other drivers that you are slowing down or stopping. Imagine a scenario where you suddenly need to hit the brakes, but the car behind you doesn’t see your lights activate. The consequences could range from a minor fender bender to a serious accident. In fact, studies show that properly functioning brake lights can significantly reduce the risk of rear-end collisions.
Beyond emergency stops, brake lights provide constant feedback. When you’re in heavy traffic, they help maintain safe following distances. When you’re approaching an intersection, they warn others of your intent. They are an indispensable part of your car’s active safety features, preventing accidents before they happen.
Legal Requirements and Consequences of Neglect
Because of their vital role in safety, brake lights are legally mandated components in virtually every country and state. Driving with a burnt-out or non-functional brake light is a violation of vehicle safety regulations. While the exact penalties vary, you could face fines, points on your license, or even a vehicle inspection order. These consequences can be much more costly and inconvenient than the few minutes it takes to change brake light bulb yourself.
Regularly checking your brake lights (and all your exterior lights) should be a standard part of your car maintenance routine. It’s a quick check that takes seconds, but the peace of mind and safety it provides are invaluable.
Gathering Your Tools and Supplies (What You’ll Need)
One of the beauties of learning how to change brake light bulb is that it doesn’t require a garage full of specialized equipment. Most of what you need you might already have lying around. The key is to be prepared before you start, so you don’t find yourself scrambling mid-task.
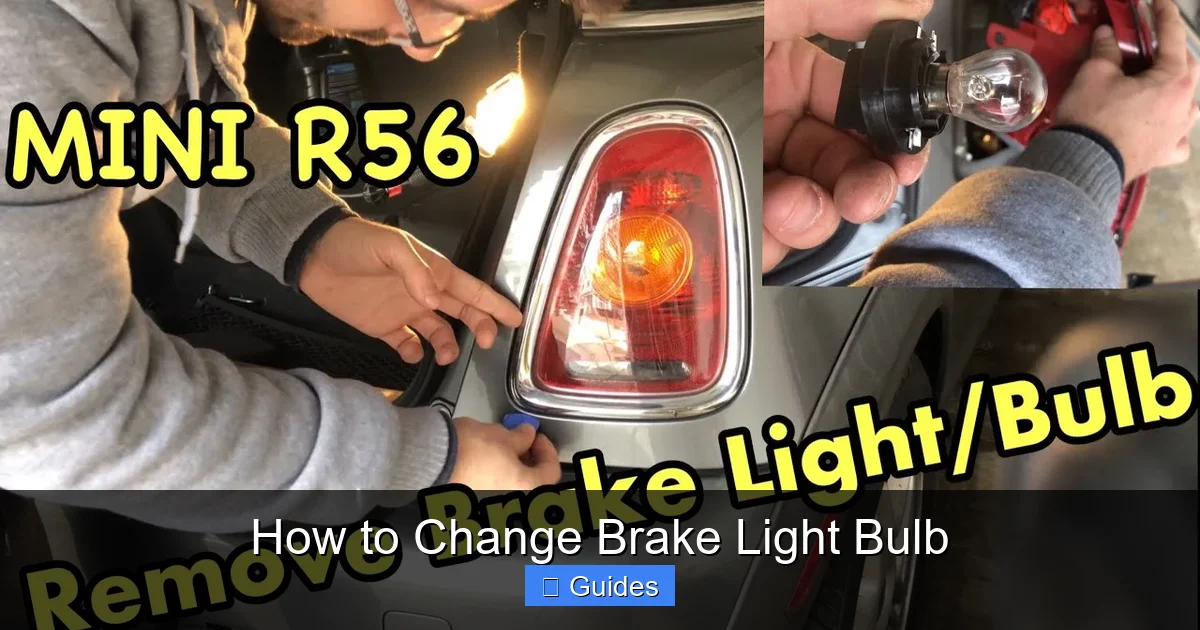
Visual guide about How to Change Brake Light Bulb
Image source: i.ytimg.com
Essential Tools for the Job
- Screwdrivers: You’ll likely need a Phillips head screwdriver, and possibly a flathead screwdriver. Some vehicles use Torx bits, so have a set handy if you suspect that’s the case.
- Ratchet and Socket Set: For some taillight assemblies, you might need to remove nuts or bolts that secure the housing. A small socket set will come in handy here.
- Trim Removal Tools (Optional but Recommended): If your taillight assembly involves interior trim panels, plastic trim removal tools can prevent scratching or damaging your vehicle’s interior.
- Gloves: Latex or nitrile gloves aren’t just for keeping your hands clean; they’re crucial for handling the new bulb safely.
- Owner’s Manual: Your car’s owner’s manual is an invaluable resource. It will tell you the exact bulb type you need, how to access the taillight assembly, and any specific precautions for your vehicle.
Choosing the Right Replacement Bulb
This is perhaps the most critical step after deciding to change brake light bulb. Using the wrong bulb can lead to functionality issues, electrical problems, or simply not fitting. There are several types of bulbs, and some vehicles use “dual filament” bulbs that serve as both a running light and a brake light, or a brake light and a turn signal.
- Consult Your Owner’s Manual: This is your best source for the correct bulb type (e.g., 1157, 3157, 7443, P21/5W).
- Check the Old Bulb: Once you’ve removed the old bulb, inspect its base. The bulb number is usually printed there.
- Visit an Auto Parts Store: Give them your car’s make, model, and year. They can look up the correct bulb for you. Many stores also have online tools for this.
- LED Conversion (Advanced): While this guide focuses on traditional incandescent bulbs, some people choose to upgrade to LED brake light bulbs for brighter light and longer life. However, this often requires additional resistors to prevent “hyper-flashing” or error messages, and it’s generally a more involved process than a simple bulb swap. For your first time changing a brake light bulb, stick with the factory-recommended type.
Safety Gear and Preparations
Safety should always be your top priority. Before you even touch a tool, make sure your car is in a safe condition to work on.
- Park on a Level Surface: This prevents your car from rolling.
- Engage the Parking Brake: An absolute must.
- Turn Off the Engine: Obvious, but worth stating.
- Chock Your Wheels (Optional but Recommended): If you’re working on an incline or just want extra peace of mind, place wheel chocks behind the wheels opposite the side you’re working on.
- Gloves: We mentioned them for bulb handling, but they also protect your hands from dirt, grease, and sharp edges.
Step-by-Step Guide: How to Change Your Brake Light Bulb
Okay, you’ve got your tools, the right bulb, and safety measures in place. Now for the main event: learning how to change brake light bulb. While exact steps can vary slightly between vehicle makes and models, the general process remains the same.
Step 1: Accessing the Taillight Assembly
This is often the trickiest part, as manufacturers design these differently. There are typically three main ways to get to your brake light bulb:
- Through the Trunk/Hatchback: Many modern vehicles allow you to access the back of the taillight assembly directly from inside the trunk or cargo area. You might need to pull back carpeted lining, or remove a small access panel. Once exposed, you’ll see wires leading to bulb sockets, usually held in place by small nuts or clips.
- From the Outside (Visible Screws): Some taillight assemblies are secured to the exterior body of the car with visible screws (often Phillips head or Torx). You’ll typically find these on the side of the assembly, near the trunk opening. Once these screws are removed, the entire taillight unit can often be carefully pulled straight back or wiggled free. Be gentle, as there may be guide pins or clips holding it in place.
- Hidden Clips/Fasteners: Less common for brake lights, but some vehicles use hidden clips that require specific trim removal tools to pop the entire assembly out. Consult your owner’s manual if you can’t find obvious access points.
Practical Tip: Once you’ve gained access, you’ll likely see several bulb sockets. Your owner’s manual will help you identify which one belongs to the brake light. It’s usually a distinct socket from the turn signal or reverse light.
Step 2: Removing the Old Bulb
With the taillight assembly exposed and the correct bulb socket identified, it’s time to remove the old, defunct bulb.
- Twist and Pull the Socket: The bulb socket itself is usually held in the taillight housing by a quarter-turn twist. Gently twist the entire socket counter-clockwise until it unlocks, then pull it straight out. The bulb will still be attached to this socket.
- Remove the Bulb from the Socket:
- Wedge-base bulbs (common for smaller bulbs): These simply pull straight out from the socket. Grab the plastic base of the bulb if possible, or gently pull on the glass if you’re careful not to break it.
- Bayonet-style bulbs (common for brake/turn signals): These bulbs have two small pins on the side of the metal base. You’ll need to push the bulb gently inward, twist it counter-clockwise, and then pull it straight out.
Practical Tip: If the bulb is stuck or corroded, a little extra wiggling might be needed. If it breaks, carefully remove any glass shards with pliers and ensure no metal pieces remain in the socket before installing the new bulb.
Step 3: Installing the New Bulb
Now for the exciting part – getting your new brake light bulb in place!
- Handle with Care: As mentioned, wear gloves and avoid touching the glass part of the new bulb with your bare hands. The oils from your skin can create hot spots on the bulb’s surface, leading to premature failure.
- Insert the New Bulb:
- Wedge-base bulbs: Simply push the new bulb straight into the socket until it’s firmly seated.
- Bayonet-style bulbs: Align the pins on the bulb’s base with the slots in the socket, push it gently inward, and then twist it clockwise until it locks into place.
- Reinsert the Socket: Push the socket back into the taillight housing, aligning any tabs or grooves, and twist it clockwise until it locks securely.
Step 4: Testing Your Work
Don’t reassemble everything just yet! It’s crucial to test the new brake light bulb before putting all the panels and screws back.
- Get a Helper: Ask a friend or family member to sit in the driver’s seat.
- Test the Brakes: Have them press the brake pedal while you stand behind the car to observe the new bulb. It should light up brightly when the pedal is pressed and turn off when released.
- Test Running Lights (if applicable): If your bulb also serves as a running light (a dual-filament bulb), have your helper turn on the headlights/parking lights to ensure the low-intensity filament also works.
- Test Turn Signals (if applicable): If it’s a multi-function bulb, test the turn signal function as well.
Practical Tip: If the new bulb doesn’t light up, don’t panic! Move on to the troubleshooting section before you start over.
Step 5: Reassembling the Taillight Assembly
Once you’ve confirmed the new brake light bulb is working perfectly, you can reverse the steps you took to access it.
- Carefully position the taillight assembly back into its place.
- Reinstall any screws, nuts, or clips you removed.
- Replace any interior trim panels or carpeting.
Congratulations! You’ve successfully managed to change a brake light bulb.
Troubleshooting Common Issues (What If It Still Doesn’t Work?)
So, you’ve gone through all the steps to change brake light bulb, and yet… nothing. Don’t worry, this happens! There are a few common culprits behind a non-functioning brake light, even after a bulb swap.
Issue 1: The New Bulb Still Doesn’t Light Up
If your brake light is still out, here are the primary things to check:
- Is the Bulb Correct? Double-check that you purchased and installed the correct type of bulb for your vehicle. An incorrect bulb might fit but won’t make the proper electrical connection.
- Is the Bulb Seated Correctly? Make sure the bulb is fully pushed into its socket or twisted into place. Sometimes, it might feel secure but isn’t making full contact.
- Is the Bulb Defective? It’s rare, but new bulbs can occasionally be faulty. If you have an extra, try swapping it out again.
- Check the Fuse: This is a very common issue. Your brake lights are protected by a fuse. If that fuse blows, neither bulb (or sometimes only one side, depending on wiring) will work.
- Locate your car’s fuse box (usually under the hood, under the dashboard, or in the trunk). Your owner’s manual will pinpoint its location.
- Find the fuse labeled for “Brake Lights,” “Stop Lights,” or something similar.
- Visually inspect the fuse. A blown fuse will have a broken or burnt wire inside.
- Replace a blown fuse with a new one of the exact same amperage rating. Never use a higher amperage fuse, as this can cause more serious electrical damage.
Issue 2: The Socket or Wiring Looks Damaged
Sometimes, the problem isn’t just the bulb or the fuse. The electrical components themselves can fail.
- Corrosion in the Socket: Inspect the inside of the bulb socket for signs of corrosion (green or white powdery residue) or rust. This can prevent a good electrical connection. You can try gently cleaning light corrosion with a small wire brush or electrical contact cleaner. If it’s heavily corroded, the socket might need replacement.
- Damaged Wires: Look for any frayed, burnt, or disconnected wires leading to the bulb socket. Physical damage, rodent activity, or even age can cause wiring issues. If you spot damaged wires, this moves beyond a simple DIY bulb change and usually requires professional attention.
- Melted Socket: In rare cases, if an incorrect bulb was used or there was an electrical fault, the plastic socket itself can melt. This is a clear sign that the socket needs to be replaced.
- Brake Light Switch: If both brake lights are out, and you’ve checked bulbs and fuses, the issue might be with the brake light switch located near your brake pedal. This is a more involved diagnosis and usually best left to a professional mechanic.
When to Call a Professional (Safety First!)
While learning how to change brake light bulb is generally a straightforward task, there are definitely situations where it’s best to hand things over to a qualified professional. Knowing your limits is part of being a responsible car owner.
Beyond a Simple Bulb Swap
If you’ve tried to change brake light bulb, checked the fuse, and inspected the socket for obvious damage, but your brake light still isn’t working, the problem likely lies deeper within your vehicle’s electrical system. This could involve:
- Complex Wiring Issues: Diagnosing a short circuit, an open circuit, or a faulty ground connection can be time-consuming and requires specialized tools (like a multimeter) and expertise. Incorrectly attempting to fix these can lead to further damage to your car’s electrical system.
- Faulty Brake Light Switch: As mentioned, if the switch that detects when you press the brake pedal is bad, your brake lights won’t activate. Replacing this can be simple on some cars, but complex on others, and requires proper adjustment.
- Module or Computer Problems: In modern cars, lighting systems can be controlled by body control modules (BCMs) or other computer units. A fault in these can cause erratic light behavior and requires diagnostic tools specific to your car’s manufacturer.
- Physical Damage to the Taillight Assembly: If the entire taillight housing is cracked, broken, or water-damaged, it might need to be replaced, which is a more involved procedure than just changing a bulb.
When You Lack Confidence or Time
Even if the issue seems simple, if you’re not comfortable with the process, or if you simply don’t have the time to dedicate to it, there’s no shame in seeking professional help. A mechanic can quickly diagnose and fix the problem, ensuring your vehicle is safe and legal without you having to stress over it. Remember, your safety and the safety of others on the road are paramount.
Maintaining Your Vehicle’s Lighting System (Prevention is Key)
Now that you’re an expert at how to change brake light bulb, let’s talk about how to prevent future issues and keep all your car’s lights shining brightly. A little preventative maintenance goes a long way in ensuring your vehicle remains safe and road-legal.
Regular Checks and Inspections
Make checking your lights a part of your routine vehicle inspection. It only takes a few minutes but can save you from a ticket or, more importantly, an accident.
- Weekly Walk-Around: Before you drive, do a quick walk-around of your car. Check headlights, taillights, turn signals, and brake lights.
- The “Brake Pedal Test”: Ask a helper to stand behind your car while you press the brake pedal. Alternatively, you can back your car up to a wall or garage door at night, press the brake pedal, and look for the reflection of your brake lights.
- Interior Light Indicators: Pay attention to your dashboard. Many modern cars have indicators that will alert you to a burnt-out bulb, especially for critical lights like brake lights.
Keeping Sockets Clean and Corrosion-Free
Corrosion is the enemy of electrical connections. Over time, moisture and dirt can get into your bulb sockets, leading to poor connections and premature bulb failure.
- During Bulb Changes: Whenever you change a brake light bulb, take a moment to inspect the socket. If you see light corrosion, gently clean it with a small wire brush, some fine-grit sandpaper, or electrical contact cleaner.
- Dielectric Grease: After cleaning (or even with a new, clean socket), apply a small amount of dielectric grease to the electrical contacts before inserting the new bulb. This helps prevent moisture ingress and corrosion, ensuring a better connection and extending bulb life.
Don’t Ignore Other Lights
While this guide focuses on how to change brake light bulb, remember that all your lights are important. Regularly check your:
- Headlights (high and low beam)
- Turn Signals (front and rear)
- Reverse Lights
- License Plate Lights
- Daytime Running Lights (DRLs)
A fully functional lighting system is crucial for visibility and safety, both for you and for other drivers on the road. By incorporating these simple maintenance habits, you can keep your vehicle safe, reliable, and compliant for years to come.
Conclusion
There you have it! The seemingly daunting task of changing a brake light bulb is actually one of the easiest and most rewarding DIY car maintenance projects. By following these step-by-step instructions, gathering the right tools, and taking proper safety precautions, you’ve not only saved yourself time and money but also gained valuable confidence in your ability to maintain your vehicle.
Remember, a functional brake light isn’t just about avoiding a ticket; it’s about ensuring your safety and the safety of everyone on the road. So the next time you notice a dim or dark brake light, don’t hesitate. Empower yourself to change brake light bulb and get back on the road safely and legally. Keep those lights shining bright!
🎥 Related Video: Remove brake light/turn signal bulb. Replace with new bulb. Installation is reverse of removal
📺 Mr. Delray
Frequently Asked Questions
How often should I check my brake lights?
It’s a good practice to check all your vehicle’s exterior lights, including brake lights, at least once a month. A quick visual inspection during a walk-around your car, or by asking a friend to check while you press the brake pedal, is sufficient.
Can a blown fuse cause my brake lights to stop working?
Yes, absolutely. A blown fuse is a very common reason for brake lights (or even all rear lights) to stop working, even if the bulbs themselves are fine. If a new bulb doesn’t work, checking the fuse box for a blown brake light fuse should be your next step.
Are LED brake light bulbs better than traditional incandescent ones?
LED brake light bulbs generally offer several advantages, including brighter illumination, faster activation time, and significantly longer lifespan compared to incandescent bulbs. However, they can be more expensive and sometimes require additional resistors to prevent “hyper-flashing” or error messages in some vehicles.
What if only one of my brake lights is out?
If only one brake light is out, it’s most likely due to a burnt-out bulb on that specific side. The wiring and fuse for the other side are likely intact. In this scenario, learning how to change brake light bulb for the affected side is usually all that’s needed.
Is it difficult to access the brake light bulb in all cars?
Accessing the brake light bulb varies greatly by vehicle model. In some cars, it’s as simple as twisting a socket from inside the trunk. In others, you might need to remove a few screws, pop out trim panels, or even partially remove the entire taillight assembly. Consulting your owner’s manual is key.
What’s the difference between a brake light and a taillight?
A taillight (or running light) is illuminated whenever your headlights or parking lights are on, providing constant visibility. A brake light, on the other hand, is significantly brighter and only illuminates when you press the brake pedal, signaling that you are slowing down or stopping. Many vehicles use a dual-filament bulb that serves as both a taillight (low intensity) and a brake light (high intensity).