
Unleash your inner artist and learn how to draw a light bulb that shines with realism and personality! This comprehensive guide breaks down the process into simple, manageable steps, covering everything from initial sketches and structural components to advanced shading, highlighting, and bringing different light bulb types to life. Get ready to illuminate your canvas with confidence, transforming simple lines into a radiant symbol of invention and inspiration.
How to Draw a Light Bulb
Have you ever looked at a simple light bulb and thought, “That would be a really cool thing to draw”? It’s a classic symbol of ideas, innovation, and illumination, making it a fantastic subject for artists of all levels. While it might seem straightforward at first glance, drawing a realistic light bulb offers a wonderful opportunity to practice fundamental art skills like understanding form, light, shadow, and reflective surfaces.
Perhaps you’re a budding artist eager to expand your repertoire, or maybe you just stumbled upon a beautiful Edison bulb and felt inspired. Whatever your motivation, this comprehensive guide is designed to walk you through the entire process of how to draw a light bulb, step-by-step. We’ll cover everything from the initial sketch to advanced shading techniques, ensuring that by the end, you’ll be able to create a light bulb drawing that truly shines. So grab your pencils, paper, and let’s get ready to bring some brilliant ideas to life on your canvas!
Getting Started: Why the Light Bulb?
Drawing a light bulb isn’t just about rendering an object; it’s about capturing light itself. It’s an exercise in seeing how curves, reflections, and internal structures interact to create a recognizable and often glowing form. It’s also incredibly rewarding to see a simple drawing transform into something that appears to hold a spark of life. We’ll approach this task with a friendly, conversational tone, as if we’re drawing together, sharing tips and tricks along the way. Get ready to demystify the process and discover the joy of illustrating this iconic invention.
Key Takeaways
- Start with Basic Shapes: Break down the complex form of a light bulb into simple geometric shapes like ovals, rectangles, and cylinders to establish your foundation.
- Understand the Components: Familiarize yourself with the key parts – the glass bulb, the filament, the support wires, and the metal base – to ensure accuracy in your drawing.
- Master Shading and Highlights: Learn to use light and shadow effectively to give your light bulb drawing dimension, depth, and the illusion of a reflective glass surface.
- Embrace Reference Images: Always use reference photos to observe subtle details, proportions, and how light interacts with different types of light bulbs.
- Experiment with Different Bulb Types: Don’t limit yourself to one style; explore drawing incandescent, LED, CFL, or decorative Edison bulbs to expand your skills.
- Practice Patience and Observation: Drawing a realistic light bulb requires careful observation of form and light, so take your time and enjoy the process of building detail.
- Add a “Glow” for Impact: Discover techniques to create a convincing glow effect, making your drawn light bulb appear truly illuminated and captivating.
Quick Answers to Common Questions
How do I make the light bulb look transparent?
To make the light bulb look transparent, focus on rendering the internal filament and wires clearly, and use subtle, soft shading on the glass itself, concentrating darker values on the edges and allowing highlights to define the curved surface rather than making it opaque.
What’s the best way to draw the filament inside the bulb?
Start with very light guide lines for the overall shape (often a U or M). Then, add tiny, tightly spaced zigzag or spiral lines within that shape to represent the coil, making sure it looks delicate and thin.
How do I add a glow effect to a drawn light bulb?
To add a glow, make the filament pure white (or its intended color) and create a soft, diffuse halo around it by gently blending very light graphite outwards, fading into the glass. You can also lightly shade the surrounding area to suggest light spill.
Should I use a ruler for drawing the light bulb’s base?
While you can use a ruler for the straight vertical lines of the base for precision, try to freehand the curved screw threads. This will give your drawing a more natural, hand-drawn feel. Lightly sketching guides helps maintain symmetry.
What’s the difference in shading between glass and metal on a light bulb?
Glass shading typically involves softer, more diffused gradients with distinct, often elongated highlights, making it appear translucent. Metal shading usually has sharper contrasts between dark and light, with very crisp, bright highlights that make the surface appear more solid and reflective.
📑 Table of Contents
- Section 1: Gathering Your Tools and Cultivating Your Mindset
- Section 2: The Basic Structure – Bulb, Filament, and Base
- Section 3: Adding Dimension and Realism – Shading and Highlights
- Section 4: Exploring Different Types of Light Bulbs
- Section 5: Advanced Techniques and Personalization
- Conclusion: Let Your Ideas Shine Bright
Section 1: Gathering Your Tools and Cultivating Your Mindset
Before we dive into the actual drawing, let’s make sure you have everything you need. Drawing a light bulb, especially one with a good level of detail, benefits from a few basic supplies. More importantly, we’ll talk about the right mindset – patience and observation are your best friends here!
Essential Art Supplies
- Pencils: A range of graphite pencils is ideal. An HB for initial sketching, a 2B or 4B for mid-tones and darker lines, and maybe a 6B or 8B for the deepest shadows.
- Paper: Any good quality drawing paper will do. Smooth paper works well for fine details and blending.
- Eraser: A kneaded eraser is fantastic for lifting graphite subtly without smudging, and a precise stick eraser can clean up small areas.
- Blender (Optional): A blending stump, tortillon, or even a cotton swab can help create smooth transitions in your shading.
- Reference Image: This is crucial! Find a clear photo of a light bulb you want to draw. Observe its shape, how light hits it, and the internal components.
The Artist’s Mindset: Patience and Observation
Drawing, especially something with reflective surfaces like a light bulb, is less about drawing what you *think* it looks like and more about drawing what you *see*.
- Observe Carefully: Look at your reference photo. Where are the brightest spots? Where are the darkest shadows? What is the exact shape of the glass? How does the filament coil?
- Take Your Time: Don’t rush. Building up a drawing, especially with shading, takes time. Enjoy the process of layering and refining.
- Don’t Be Afraid to Erase: Mistakes are part of learning. Erasing allows you to refine your lines and shapes until they feel right.
Section 2: The Basic Structure – Bulb, Filament, and Base
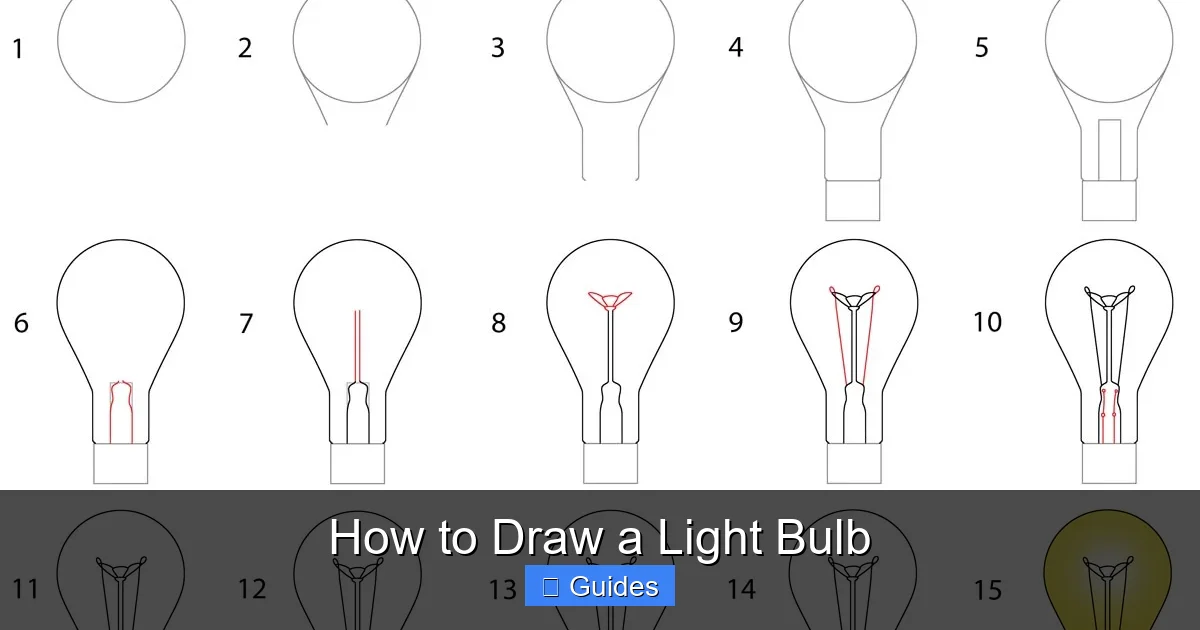
Visual guide about How to Draw a Light Bulb
Image source: cool2bkids.com
Every great drawing starts with a solid foundation. When learning how to draw a light bulb, we’ll begin by breaking down its complex form into simpler shapes. Think of it like building blocks.
Step 1: Sketching the Glass Bulb Shape
The most recognizable part of a light bulb is its glass enclosure. Most standard incandescent bulbs have a classic pear or teardrop shape.
- Light Axis Line: Start by drawing a light vertical line down the center of your page. This will be your symmetry guide. A symmetrical light bulb will look much more convincing.
- The Oval/Teardrop: Lightly sketch a large oval or a teardrop shape around your axis line. This will define the main body of the glass bulb. Pay attention to the curve at the top and how it narrows towards the bottom where it meets the base. Don’t press too hard; these are just guide lines.
- Refining the Curve: Look at your reference. Does the curve flow smoothly? Is one side slightly wider? Make small adjustments to ensure both sides of the light bulb are balanced along your central axis.
Step 2: Drawing the Metal Base
The base is what connects the bulb to its power source. It’s usually a screw-thread or bayonet type. We’ll focus on the more common screw-thread for this guide.
- The Cap: Below the main glass bulb, draw a small, slightly flattened oval or cylinder shape. This is the very bottom contact point of the base.
- The Threaded Section: From the bottom of the glass bulb, draw two vertical lines extending downwards, parallel to your central axis line. These lines will form the main cylindrical body of the base.
- Adding the Threads: Gently draw curved, horizontal lines across this cylinder, mimicking the spiral of the screw threads. These lines should curve slightly upwards on both sides, creating the illusion of depth. Make them evenly spaced.
- The Insulator: Between the threaded section and the very bottom cap, there’s usually a small, distinct band of insulating material. Draw a thin rectangle here.
Step 3: Creating the Internal Structure (The Filament)
This is where the magic happens – the part that actually glows! The filament is the thin wire inside the light bulb.
- The Support Rod: From the inside bottom of your glass bulb (just above where the glass meets the metal base), draw a small, thick glass rod extending upwards. This rod supports the filament assembly.
- Support Wires: From the top of this glass rod, draw two very thin, delicate wires arching upwards and slightly inwards. These wires will hold the filament in place.
- The Filament Coil: This is the tricky part! The filament is typically a tightly coiled wire. Very lightly, sketch a long, narrow “U” or “M” shape between the two support wires. Then, within this shape, draw tiny, parallel zigzag lines or tightly wound spirals to suggest the coil. Don’s worry about perfect detail at this stage; just capture the essence of its coiled nature.
At this point, you should have a clear outline of your light bulb, including its internal components. Take a step back and check your proportions. Does it look like a light bulb? Great!
Section 3: Adding Dimension and Realism – Shading and Highlights
Now that we have the structure, it’s time to bring your light bulb to life with shading. This is where you transform a flat outline into a three-dimensional object, making the glass look transparent and the metal shiny.
Understanding Light Sources
Before you shade, decide where your light source is coming from. Is it from the top, side, or front? This will dictate where your highlights and shadows fall. For our purposes, let’s imagine the light source is coming from the upper left.
Defining Shadows: Giving Form to the Glass
The glass bulb isn’t uniformly lit. It will have darker areas where light doesn’t directly hit it, and reflections.
- Edge Shading: Start by lightly shading along the edges of the glass bulb, especially on the side opposite your light source (the right side in our example). The glass is curved, so light tends to bend around it, creating subtle shadows near the edges.
- Gradient Shading: Apply a very light, smooth layer of graphite across the entire glass bulb, leaving the very brightest areas untouched for now. Then, gradually build up darker tones in the areas that curve away from the light. Remember that glass isn’t completely opaque; you should still be able to see the filament through it.
- Shadow under the Bulb: If your light bulb is resting on a surface or in a socket, there will be a cast shadow beneath the glass bulb and the metal base. Draw this shadow directly beneath the object, making it darker and more defined closer to the bulb, and fading out as it extends away.
Creating Highlights: The Illusion of Shine
Highlights are what make glass look like glass and metal look like metal. They are the brightest points where light reflects directly off the surface.
- Reflections on Glass: Observe your reference photo closely. Glass often has distinct, bright white reflections. These aren’t just random spots; they usually appear as elongated, slightly curved streaks or patches. Use your kneaded eraser to lift graphite in these areas, creating sharp, bright highlights. A light bulb often has a primary highlight (where the main light source reflects) and secondary, softer reflections.
- Reflections on Metal: The metal base will also have highlights. These will likely be sharper and more defined than those on the glass, making the metal appear more solid and reflective. Use a stick eraser or the sharp edge of a kneaded eraser to create crisp, bright lines and shapes on the screw threads and the bottom cap.
Texturing the Filament and Wires
The filament itself is a small but crucial detail.
- Darken the Coil: Make the filament coil darker, especially on the side furthest from your imagined light source. This will give it more depth.
- Subtle Shine: Even a tiny filament can have a hint of shine. Leave tiny, almost imperceptible slivers of white on the very edges of the coil, or use a very sharp pencil to add a few bright dots to suggest its metallic nature.
- Support Wires: Make the support wires visible but very thin. They don’t need heavy shading, just enough to distinguish them from the background.
By now, your light bulb should be starting to look wonderfully three-dimensional!
Section 4: Exploring Different Types of Light Bulbs
While we’ve focused on the classic incandescent light bulb, the world of illumination is vast! Learning how to draw a light bulb of different varieties can be a fun challenge and expand your artistic skills.
The Classic Incandescent Bulb
This is the iconic pear-shaped bulb we’ve been drawing. Its main characteristics are the thin, coiled filament, the vacuum-sealed glass, and the metal screw base. The beauty in drawing these lies in capturing the delicate internal structure and the subtle curves of the glass.
Modern LED Bulbs
LED bulbs look quite different. They often have:
- A Diffuser: Instead of clear glass, many LEDs have a frosted or milky plastic diffuser at the top to spread light evenly. When drawing this, you’ll want less sharp highlights and more of a soft, diffused light effect.
- A Solid Base: The base tends to be thicker and more opaque, often white plastic or aluminum, concealing the electronics. Shading will focus on matte textures rather than shiny metal.
- No Visible Filament: You won’t see a traditional filament. If it’s a “filament style” LED, then you’d draw tiny LED filaments that mimic the old style, but they’re typically much thicker and often arranged differently.
Compact Fluorescent Lamps (CFLs)
These are often recognized by their distinctive spiral or U-shaped tubes.
- Tubular Forms: The main challenge here is rendering the curved, often multiple, tubes accurately in perspective. Focus on smooth, continuous lines.
- Frosted Glass: Like many LEDs, CFLs often have a frosted glass or plastic, meaning diffused light and softer highlights.
- Bulky Base: The base often houses the ballast and is usually a sturdy, opaque plastic.
Edison Bulbs and Decorative Filaments
These have become very popular for their vintage aesthetic.
- Clear Glass: Often very clear, showcasing elaborate filaments. This means more pronounced highlights and shadows on the glass.
- Intricate Filaments: The filament is the star here. It can be a squirrel cage, a Christmas tree, or other decorative patterns. You’ll need extra patience and precision to draw these intricate coils.
- Amber Tint: Some have an amber-tinted glass, which you can suggest with warmer, subtler shading tones if you’re working with color, or by adjusting the overall darkness and glow effect in graphite.
Practicing how to draw a light bulb of different styles will significantly enhance your versatility as an artist.
Section 5: Advanced Techniques and Personalization
Once you’ve mastered the basics of how to draw a light bulb, you can start experimenting with more advanced techniques to truly make your drawing pop.
Creating a Convincing Glow Effect
This is perhaps the most captivating aspect of drawing a light bulb. How do you show it’s actually *on*?
- Radiant Core: If your light bulb is “on,” the filament should be the brightest point. Make it almost pure white, or use a yellow/orange color if you’re drawing in color.
- Subtle Halo: Around the brightest part of the filament, create a soft, subtle “halo” effect. This is usually done by blending a very light layer of graphite or by gently lifting graphite with a kneaded eraser to create a soft, glowing aura. Avoid harsh lines.
- Light Spill: Light doesn’t just stay within the bulb. It spills out and illuminates its surroundings. Draw a soft, diffused light radiating from the bulb onto the immediate area around it, fading as it gets further away. This is typically a very light gradient of shading.
Adding Texture and Materiality
Think about the specific textures.
- Roughness of the Metal: If the metal base is old, it might have slight pitting or scratches. You can suggest these with tiny, irregular marks in your shading.
- Imperfections in Glass: A truly realistic light bulb might have tiny imperfections, dust, or smudges on the glass. These are subtle details that can add character.
Stylization vs. Realism
Not every light bulb drawing needs to be hyper-realistic. You can choose to stylize it!
- Cartoon Style: Simplify shapes, use bold outlines, and perhaps add “light rays” to quickly convey a glowing light bulb.
- Illustrative Style: You might exaggerate certain features or use patterns within the shading to give it a unique look.
The beauty of knowing how to draw a light bulb realistically is that it gives you the foundation to then simplify or stylize it effectively.
Conclusion: Let Your Ideas Shine Bright
You’ve now embarked on a brilliant journey into learning how to draw a light bulb, transforming simple lines into a radiant symbol of invention and inspiration. From understanding its basic components to mastering the nuances of shading and highlights that give glass its reflective quality, you’ve gained invaluable skills. Remember, drawing is a continuous learning process. Each light bulb you draw will be a little better than the last, building on your observation skills and technical prowess.
Don’t be afraid to experiment with different types of bulbs, explore various lighting scenarios, or even add a creative twist to your drawings. The light bulb is a versatile subject, perfect for practicing reflective surfaces, internal structures, and the captivating illusion of light. So keep practicing, keep observing, and let your creativity illuminate your path. Happy drawing!
🎥 Related Video: Bulb drawing… #bulb #minoarts #shortsfeed #ytshorts #viralshorts #drawing #drawingtutorial #shorts
📺 Mino Arts
Frequently Asked Questions
What materials do I need to start drawing a light bulb?
You’ll primarily need a range of graphite pencils (HB, 2B, 4B), good quality drawing paper, an eraser (kneaded and stick), and optionally a blending stump. A clear reference image of a light bulb is also essential.
How can I make my light bulb drawing symmetrical?
Start by drawing a faint vertical axis line down the center of your page. Use this line as a guide to ensure both sides of your glass bulb and the metal base are balanced and evenly shaped. Constantly check your drawing against this line.
What’s the hardest part about drawing a light bulb realistically?
Many artists find rendering the reflective surface of the glass and creating a convincing “glow” to be the most challenging aspects. It requires careful observation of highlights, shadows, and how light passes through and reflects off the material.
Can I draw a light bulb using colors instead of just graphite?
Absolutely! Using colored pencils, markers, or paints can add another dimension to your light bulb drawing. Consider the color of the glass (clear, frosted, amber) and the warmth of the light emanating from the filament (yellow, white, blue).
How do I prevent my light bulb drawing from looking flat?
To add dimension, focus heavily on shading and highlights. Build up smooth tonal gradients, define clear areas of light and shadow, and use sharp highlights to simulate reflections on the glass and metal surfaces. Don’t be afraid to use a wide range of values from very light to very dark.
Is it better to draw a light bulb from imagination or with a reference?
For beginners aiming for realism, always start with a clear reference image. It helps you accurately observe the light bulb’s complex shape, proportions, how light interacts with the materials, and the intricate details of the filament and base.