Dealing with a broken light bulb can be tricky, but it’s a manageable task with the right approach. Always prioritize safety by turning off the power and wearing protective gear like gloves and safety glasses. Various tools such as pliers, a potato, or a bottle cork can help you safely extract the remaining bulb base from its socket, ensuring a smooth and hazard-free removal process.
We’ve all been there: that dreaded moment when you try to change a light bulb, and instead of unscrewing cleanly, the glass part separates, leaving the metal base stubbornly stuck in the socket. It’s frustrating, a little scary, and definitely not how you planned your evening. But don’t panic! While a broken light bulb can seem like a daunting and dangerous problem, it’s a common household mishap that can be safely resolved with the right knowledge, tools, and a bit of patience.
Getting a broken light bulb out isn’t just about convenience; it’s about safety. Exposed electrical components and sharp glass shards present immediate risks. This comprehensive guide will walk you through every step of how to get a broken light bulb out, from initial safety precautions to various removal methods and proper cleanup. Our goal is to empower you with the confidence and know-how to tackle this task without calling an electrician, all while keeping yourself and your home safe. Let’s illuminate the path to a quick and effective solution!
Key Takeaways
- Safety First: Always turn off the power to the fixture at the switch and the circuit breaker before attempting to remove a broken bulb.
- Wear Protective Gear: Use safety glasses, sturdy work gloves, and closed-toe shoes to protect against glass shards and electrical hazards.
- Assess the Situation: Determine if there’s enough of the metal base exposed to grip with pliers, or if glass shards are still present, requiring a different method.
- Choose the Right Tool: Depending on the remaining parts, you might use needle-nose pliers, a potato/apple, a bottle cork/rubber stopper, or even a specialized tool.
- Gentle and Steady Pressure: Avoid forcing the bulb; apply steady, counter-clockwise pressure to unscrew the base.
- Proper Cleanup and Disposal: Carefully collect all glass fragments using a damp paper towel or vacuum and dispose of them safely in a puncture-proof container.
- When to Call a Professional: If you’re unsure, uncomfortable, or the bulb is truly stuck and poses a significant risk, don’t hesitate to contact a qualified electrician.
Quick Answers to Common Questions
Can I get an electric shock even if the light switch is off?
Yes, absolutely. A wall switch only interrupts one side of the electrical circuit. There can still be live current in the fixture, and a faulty switch or wiring could also pose a risk. Always turn off power at the circuit breaker.
What if I don’t have safety glasses?
Do not proceed without eye protection. Even small glass fragments can cause serious eye injury. If you don’t have safety glasses, improvise with regular eyeglasses (though less ideal) or find a pair before attempting removal.
Is it safe to use water to clean up glass around an electrical socket?
No, never use excessive water directly around an electrical socket, even if the power is off. A damp paper towel is fine for wiping the exterior and threads, but avoid spraying or pouring water as moisture can linger and cause issues when power is restored.
What if the base crumbles when I try to grip it?
If the base crumbles, switch to a method that relies on embedding, like the potato or bottle cork trick. This allows you to gather more fragmented pieces and provide a better grip without further breaking down the base.
Can I use super glue to attach something to the base for removal?
While some people suggest this, it’s generally not recommended. Super glue can create a permanent bond, potentially making the situation worse if it adheres to the socket threads. It also exposes you to more chemicals and fumes in a potentially confined space.
📑 Table of Contents
Safety First: Essential Precautions Before You Begin
Before you even think about touching that broken bulb, your absolute top priority must be safety. Ignoring these steps can lead to cuts, electric shocks, or worse. Take a deep breath, gather your thoughts, and ensure you’ve covered all your bases. Knowing how to get a broken light bulb out safely starts here.
Turn Off the Power – Absolutely Critical
This is the single most important step. Do not, under any circumstances, try to remove a broken bulb with the power still on.
- Flip the Light Switch: Start by turning off the wall switch that controls the fixture.
- Head to the Circuit Breaker: This is the crucial step. Even if the light switch is off, there could still be residual current, or someone might accidentally flip the switch back on. Go to your electrical panel (usually in the basement, garage, or a utility closet) and locate the breaker for the room or fixture you’re working on. Flip it to the “OFF” position. If you’re unsure which breaker it is, it’s always safest to turn off the main breaker for your entire home.
- Test the Socket: After turning off the breaker, use a non-contact voltage tester (if you have one) to confirm that there’s no power reaching the light fixture. If you don’t have a tester, try flipping the light switch on and off again to ensure no light comes on. This provides an extra layer of reassurance.
Gather Your Protective Gear
Once the power is off, it’s time to gear up. Think of this as preparing for a mini-construction project in your home.
- Safety Glasses or Goggles: Glass shards can fly. Protect your eyes at all costs.
- Sturdy Work Gloves: Heavy-duty work gloves (leather or thick rubber) are essential to protect your hands from sharp glass and provide a better grip. Avoid thin household gloves.
- Closed-Toe Shoes: In case any glass falls, you don’t want bare feet or sandals.
- Long Sleeves/Pants: While not always strictly necessary, covering exposed skin can offer additional protection against errant glass fragments.
- Stepladder or Sturdy Chair: Ensure you have a stable platform to reach the fixture comfortably and safely. Don’t stand on wobbly chairs or precarious stacks of books.
Clear the Area
Before you begin the actual removal, make sure the workspace is clean and well-lit.
- Remove Obstructions: Move any furniture, rugs, or delicate items from directly beneath the fixture.
- Place a Drop Cloth: Lay down a drop cloth, old newspaper, or a thick blanket to catch any falling glass shards, making cleanup easier.
- Adequate Lighting: Use a flashlight or headlamp to ensure you can clearly see what you’re doing, especially since the fixture’s power is off.
Tools You’ll Need for the Job
Having the right tools makes all the difference when you’re trying to figure out how to get a broken light bulb out. You likely have most of these lying around your house already.
Basic Safety Tools
We’ve already touched on these, but they bear repeating as they are fundamental:
- Safety Glasses/Goggles
- Heavy-Duty Work Gloves
- Non-Contact Voltage Tester (highly recommended for peace of mind)
- Stepladder/Sturdy Chair
Primary Removal Tools
Depending on how the bulb broke and what’s left, you might use one of these:
- Needle-Nose Pliers or Lineman’s Pliers: These are often the go-to tools if there’s enough of the metal base exposed to grip securely. Their narrow jaws can get into tight spaces.
- Potato or Apple: This might sound unconventional, but it’s a surprisingly effective method for bases that are mostly glass shards, with little metal to grip. A firm, raw potato or apple is used.
- Bottle Cork or Rubber Stopper: Similar to the potato, a wine cork or a rubber stopper can work if the base is mostly intact but without a lip for pliers.
- Specialized Broken Bulb Extractor Tool: These tools are designed specifically for this purpose and can be a good investment if you frequently deal with older fixtures or have trouble with other methods.
Cleanup and Disposal Tools
Don’t forget about the aftermath!
- Small Dustpan and Brush: For sweeping up larger pieces of glass.
- Vacuum Cleaner with Hose Attachment: Ideal for picking up tiny, invisible glass shards from carpets or hard floors.
- Damp Paper Towels: For a final wipe-down of the socket and surrounding area to catch any remaining fine glass dust.
- Puncture-Proof Container: An old plastic bottle, a cardboard box, or a thick plastic bag for safe disposal of broken glass.
Step-by-Step Guide: How to Get a Broken Light Bulb Out Safely
Now that you’re prepared and protected, let’s dive into the actual removal process. Remember to work slowly and methodically. This isn’t a race; it’s about getting the job done safely.
Initial Assessment and Preparation
Before choosing a specific method for how to get a broken light bulb out, take a moment to assess the situation.
- Examine the Bulb Base: What’s left inside the socket? Is it mostly the metal screw base? Are there still significant glass shards protruding? Is it a clean break, or are there jagged edges?
- Clean Any Loose Debris: Gently brush away any obvious loose glass shards from the immediate rim of the socket before you start.
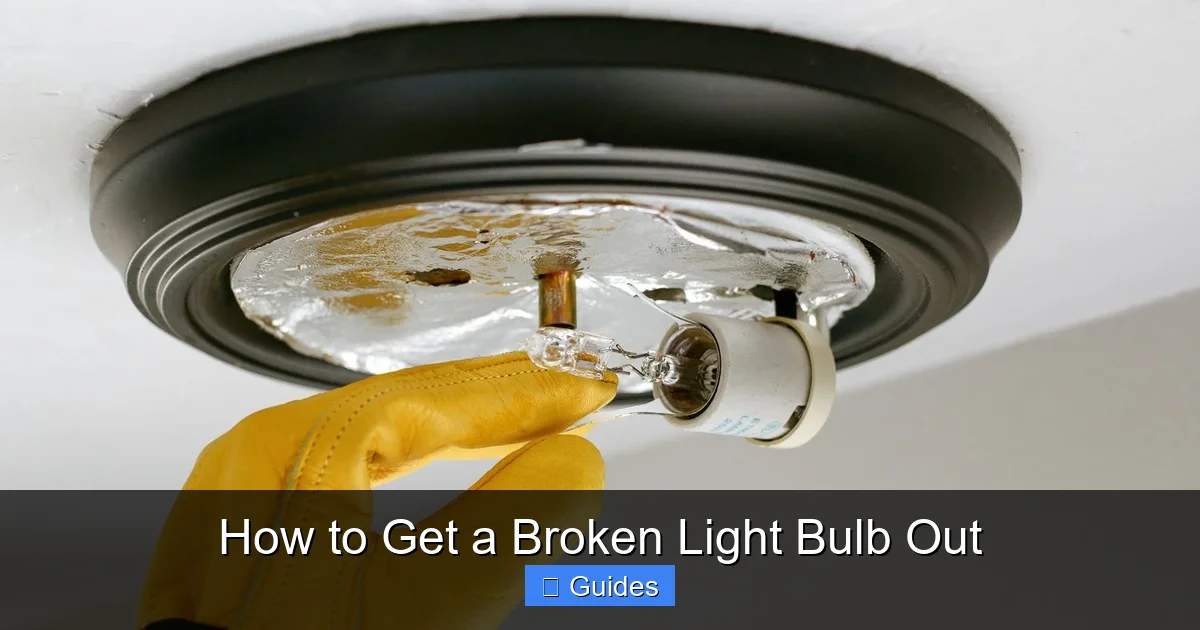
Method 1: The Pliers Approach (for exposed metal base)
This is often the easiest method if there’s enough of the metal base of the bulb still exposed to get a good grip.
- Select Your Pliers: Needle-nose pliers or lineman’s pliers work best. Ensure they have a strong, non-slip grip.
- Grip the Metal Base: Carefully open the jaws of the pliers and firmly grip the outer edge of the metal base. Try to get as much surface area as possible.
- Twist Counter-Clockwise: With a firm and steady motion, slowly twist the pliers counter-clockwise. You should feel the base start to unscrew. Be gentle but firm; avoid crushing the base, which could make it harder to grip.
- Continue Until Free: Keep twisting until the broken base is completely unscrewed from the socket.
- Inspect and Clean: Once removed, inspect the socket for any remaining debris.
Tip: If the base is very thin or stuck, you might try gripping the inside edges of the base if possible, rather than the outer rim, to get more leverage.
Visual guide about How to Get a Broken Light Bulb Out
Image source: thespruce.com
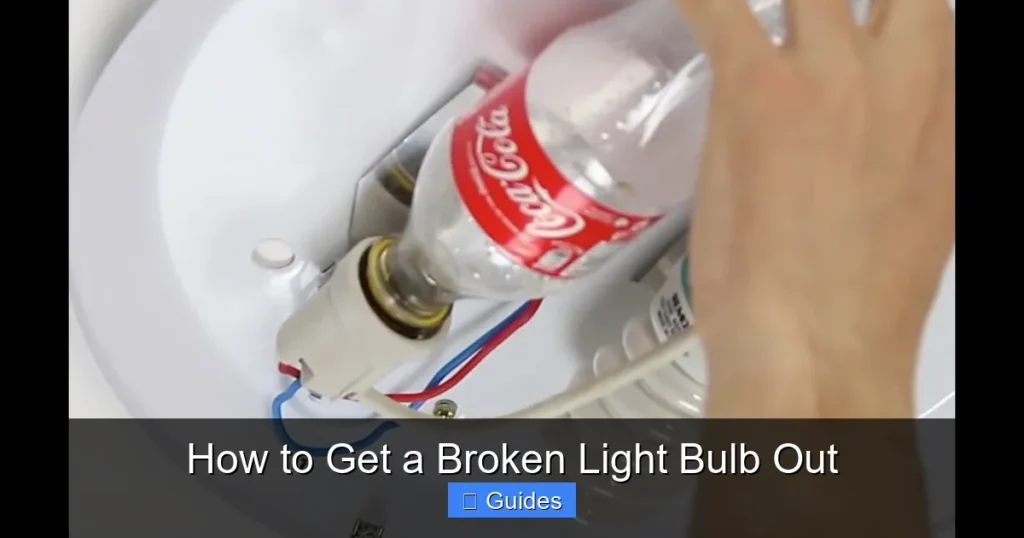
Method 2: The Potato or Apple Trick (for glass shards)
This method is incredibly effective when glass shards are still present, making pliers risky or impossible to use.
- Prepare Your Vegetable: Take a medium-sized, firm, raw potato (or a sturdy apple). Cut it in half, exposing the moist, fleshy interior.
- Press and Twist: Carefully press the cut side of the potato firmly onto the broken glass and metal base inside the socket. The potato should embed itself around the remaining glass and metal.
- Form a Grip: Apply firm, steady pressure, and then slowly twist the potato counter-clockwise. The potato’s flesh will create a natural grip around the broken parts, allowing you to unscrew the base.
- Remove and Inspect: Once the base is free, carefully remove the potato. Dispose of the potato and the embedded glass/metal safely.
Tip: Ensure the potato is large enough to handle comfortably and provides a wide enough surface area to press firmly against the entire remaining base.
Method 3: The Bottle Cork/Rubber Stopper Technique (for wider bases)
Similar to the potato method, this works well for bases that have a wider opening, allowing the cork to fit inside.
- Select a Cork/Stopper: Find a wine cork or a rubber stopper that’s slightly smaller than the diameter of the bulb’s base, but large enough to fit snugly.
- Insert and Twist: Push the cork or stopper firmly into the center of the broken bulb base. The material of the cork or rubber will wedge into the remaining base.
- Unscrew: Once firmly wedged, twist the cork counter-clockwise, applying steady pressure, to unscrew the base from the socket.
Tip: If the cork doesn’t fit snugly, you can sometimes wrap it with a thin rubber band or a piece of cloth to create more friction.
Method 4: Needle-Nose Pliers or Tweezers (for stubborn small bits)
Sometimes, after removing the main base, you might find small, stubborn fragments of metal or glass still clinging to the socket threads.
- Careful Gripping: Use very fine needle-nose pliers or sturdy tweezers to carefully grip each remaining piece.
- Pry or Twist: Gently pry them away or twist them counter-clockwise if they are part of the thread. Be extra cautious not to damage the socket’s internal threads.
Warning: This method requires extreme precision and a very light touch to avoid damaging the socket or cutting yourself.
What to Do If It’s Stuck or Difficult
Even with all the right methods, sometimes a broken light bulb just won’t budge. This can happen if the base is corroded, over-tightened, or has fused to the socket.
Don’t Force It
If you’ve tried a few methods and the base still isn’t moving, or if you feel like you’re applying excessive force, stop. Forcing it can strip the socket threads, damage the fixture, or even cause the socket to break, leading to a much more expensive repair. It’s better to reassess than to cause more damage.
Seek Professional Help
When in doubt, or if you encounter any of the following, it’s always best to call a qualified electrician:
- Extreme Corrosion: If the base is heavily rusted or corroded and seems fused to the socket.
- Damaged Socket: If the socket itself appears damaged, cracked, or if you see exposed wiring.
- Persistent Trouble: If you’ve tried multiple methods and still can’t get the broken light bulb out safely.
- Uncomfortable or Unsure: If at any point you feel unsafe, unsure of what to do, or simply not confident in your ability to complete the task without risk.
An electrician has specialized tools and expertise to handle these situations safely and efficiently.
When to Use Lubricant (Cautiously)
In rare cases, if the base is very stuck due to corrosion or over-tightening, a very small amount of penetrating oil or WD-40 can *sometimes* help.
- Extreme Caution: Only use this if you are absolutely certain the power is off and tested.
- Apply Sparingly: Apply a tiny amount to the threads of the base, aiming away from the electrical contacts.
- Wait: Let it sit for 5-10 minutes to penetrate.
- Clean Thoroughly: After removal, ensure you thoroughly clean the socket of any lubricant residue before installing a new bulb. Lubricants can be flammable and can attract dust, leading to future problems. This is a last resort and should be done with extreme care.
Cleaning Up and Safe Disposal
Successfully removing the broken base is a huge accomplishment, but the job isn’t done until you’ve cleaned up thoroughly and safely disposed of all debris.
Carefully Collect All Shards
Glass shards, even tiny ones, can be very dangerous.
- Visual Inspection: First, visually scan the entire area where you were working.
- Sweep/Brush: Use a small brush and dustpan to sweep up any larger pieces of glass from the floor or drop cloth.
- Vacuum: For smaller, harder-to-see fragments, use a vacuum cleaner with a hose attachment. Go over the area thoroughly, including any carpet, rugs, or upholstery nearby.
- Damp Paper Towel: For a final pass, carefully wipe the socket and surrounding area with a damp paper towel. The moisture helps tiny glass fragments adhere to the paper. Dispose of the paper towel immediately.
Proper Disposal Practices
Never just toss broken glass into your regular trash bin, especially if it’s in a flimsy bag.
- Puncture-Proof Container: Place all broken glass (from the bulb, the potato/cork, and any other cleanup materials) into a sturdy, puncture-proof container. An empty plastic milk jug, a thick cardboard box, or an old coffee can work well.
- Seal Securely: Seal the container tightly with tape or a lid.
- Label Clearly: Label the container “BROKEN GLASS” to warn sanitation workers.
- Special Instructions: Check with your local waste management facility for any specific instructions on disposing of broken glass or hazardous waste. Some areas may have specific drop-off points.
Testing and Replacing the Bulb
Once everything is clean and tidy, you can safely proceed to install a new bulb.
- Inspect the Socket: Before screwing in a new bulb, take one last look at the socket to ensure it’s free of debris and appears undamaged.
- Install New Bulb: Carefully screw in your new light bulb, ensuring it’s the correct wattage and type for the fixture. Don’t overtighten it.
- Restore Power: Go back to your circuit breaker panel and flip the breaker for that fixture back to the “ON” position.
- Test the Light: Flip the light switch on to confirm your new bulb works. Success!
Learning how to get a broken light bulb out is a valuable skill for any homeowner. It saves you time, money, and the hassle of calling an electrician for a relatively simple task. By always prioritizing safety, gathering the right tools, and approaching the situation methodically, you can quickly and confidently resolve this common household problem. Remember, if at any point you feel uncomfortable or unsure, don’t hesitate to seek professional help. Your safety is always paramount.
Frequently Asked Questions
How can I prevent light bulbs from breaking in the socket in the future?
To prevent future broken bulbs, avoid overtightening new bulbs; screw them in until snug, but not excessively tight. Also, when removing old bulbs, twist gently and apply steady counter-clockwise pressure. Consider using bulbs with a plastic base instead of aluminum for less chance of corrosion.
What if the broken bulb is in a recessed light fixture?
The principles remain the same for recessed fixtures: turn off power at the breaker, wear protective gear, and use one of the removal methods (pliers, potato, cork). The main challenge might be access; use a stable ladder and ensure you have clear visibility into the recessed can.
Are there any specialized tools for getting broken light bulbs out?
Yes, there are specialized broken bulb extractor tools available at hardware stores. These usually have a rubber or expandable grip designed to fit inside the remaining base and provide leverage for twisting. They can be a worthwhile investment if you frequently encounter this issue or have particularly stubborn bulbs.
What if the socket itself seems damaged after the bulb breaks?
If the socket appears cracked, scorched, or if you see exposed wires, do not attempt to install a new bulb or restore power. This indicates damage that could be a fire or shock hazard. Call a qualified electrician immediately to inspect and repair or replace the fixture.
Can a broken bulb cause a short circuit?
Yes, a broken bulb can potentially cause a short circuit, especially if metal shards come into contact with the live parts of the socket, or if the remaining base bridges the electrical contacts. This is another critical reason why turning off the power at the circuit breaker is absolutely essential before any attempt to remove the bulb.
Is there a “best” method for removing a broken light bulb?
The “best” method depends on how the bulb broke. If you have enough of the metal base exposed, pliers are often the easiest. If there are sharp glass shards, the potato or bottle cork method is safer and highly effective for providing a grip without risking cuts. Always assess the situation before choosing your tool.