Changing a recessed light bulb might seem daunting, but it’s a straightforward task with the right approach. Always prioritize safety by turning off the power at the circuit breaker before starting. Identify your specific bulb type, gather the necessary tools, and follow a few simple steps to remove the old bulb and install a new one, ensuring you match the bulb’s specifications for optimal lighting and safety.
Welcome, friend! So, you’ve got a dark spot in your ceiling where a trusty recessed light once shone brightly? Don’t fret! Changing a recessed light bulb might look a little intimidating compared to a standard lamp bulb, but I promise you, it’s a task anyone can handle with a bit of guidance and the right precautions.
Recessed lighting, often called can lights or pot lights, is a popular choice for its sleek, flush appearance that blends seamlessly into the ceiling. They’re great for general illumination, accent lighting, or task lighting, but like all good things, their bulbs eventually burn out. Instead of calling an electrician, let’s walk through exactly how to change a recessed light bulb yourself, saving you time and money. This comprehensive guide will cover everything from identifying your specific bulb type to safely removing the old one and installing a shining new replacement.
Let’s shed some light on this process together, shall we? You’ll be a recessed lighting pro in no time!
Key Takeaways
- Safety First: Always turn off the power to the fixture at the circuit breaker before attempting to change a recessed light bulb to prevent electrical shock.
- Identify Bulb Type: Recessed fixtures use various bulb types (e.g., screw-in, GU10 twist-and-lock, MR16 pin-type). Knowing yours is crucial for replacement.
- Gather Tools: You’ll likely need a ladder, gloves, eye protection, and potentially a suction cup tool or pliers, depending on the bulb and fixture.
- Accessing the Bulb: Some recessed lights require removing a trim ring or housing to access the bulb, often held by springs or clips.
- Proper Installation: When installing a new bulb, ensure it’s securely fastened but not overtightened. Handle halogen bulbs with a cloth to avoid oil transfer.
- Troubleshooting: If the new bulb doesn’t work, double-check the power, bulb seating, and bulb compatibility before suspecting a fixture issue.
Quick Answers to Common Questions
Can I replace an old incandescent recessed light bulb with an LED?
Yes, in most cases, you can replace an old incandescent or halogen recessed light bulb with an LED equivalent. Just ensure the LED bulb has the same base type (e.g., E26, GU10), is compatible with your fixture’s voltage, and is dimmable if your fixture uses a dimmer switch.
What do the numbers on a recessed light bulb (e.g., PAR30, BR40) mean?
The numbers (e.g., 30, 40) on PAR (Parabolic Aluminized Reflector) and BR (Bulged Reflector) bulbs indicate the bulb’s diameter in eighths of an inch. So, a PAR30 bulb is 30/8 inches (or 3.75 inches) in diameter.
Do I need a special tool to remove a recessed light bulb?
For most standard screw-in bulbs, you don’t need a special tool, just your hand. However, for smooth-surfaced PAR/BR bulbs or deeply recessed ones, a rubber suction cup tool can be very helpful for grip and ease of removal/installation. Some GU10 and MR16 bulbs might have clips requiring a gentle manipulation, possibly with needle-nose pliers.
Why should I avoid touching halogen bulbs with bare hands?
The oils from your skin can transfer to the glass surface of a halogen bulb. When the bulb heats up, these oils create hot spots that can cause the glass to weaken, leading to premature failure or even shattering. Always use gloves or a clean cloth when handling halogen bulbs.
What if my recessed light doesn’t have a visible bulb to change?
If you don’t see an obvious bulb to screw or twist out, you likely have an integrated LED fixture. In these cases, the LED light source is built directly into the fixture itself. If it fails, you usually have to replace the entire fixture or, in some designs, just the replaceable LED module. This typically requires more extensive electrical work.
📑 Table of Contents
Safety First: Essential Precautions
Before you even think about touching that dark fixture, safety needs to be your absolute top priority. We’re dealing with electricity here, and a moment of carelessness can lead to serious injury. Think of it like this: you wouldn’t drive a car blindfolded, so don’t attempt electrical work without proper safety measures.
Power Down!
This is the single most important step. You absolutely *must* cut the power to the fixture before doing anything else.
- Locate Your Breaker Box: This is usually in a utility closet, basement, garage, or even outside.
- Identify the Correct Breaker: Look for labels that indicate which rooms or circuits the breakers control. If they’re not labeled, you might need to flip breakers one by one until the light in question (or nearby lights/outlets) goes out.
- Test the Switch: Once you’ve flipped the breaker, go back to the room and try flipping the wall switch for the recessed light. If the light doesn’t come on (even if it was working before), you’ve successfully cut the power.
- Consider a Lockout Tagout Device: For extra peace of mind, especially if others are in the house, consider using a lockout tagout device on the breaker to prevent someone from accidentally turning it back on while you’re working.
Never assume the wall switch is enough. A wall switch only breaks one side of the circuit, and there can still be live power in the fixture. Always go to the breaker.
Stable Ladder or Step Stool
Recessed lights are in the ceiling, which means you’ll need to reach them.
- Use a Sturdy Ladder: Ensure it’s in good condition, on a level surface, and properly extended (if it’s an extension ladder).
- Have Someone Spot You: If possible, ask a friend or family member to hold the base of the ladder for added stability, especially if you’re reaching.
- Avoid Makeshift Solutions: Don’t stand on chairs, wobbly boxes, or anything that isn’t designed to be a stable platform. A fall can be far more dangerous than the light bulb itself.
Proper PPE (Personal Protective Equipment)
Protect your hands and eyes.
- Work Gloves: Electrical work gloves can offer an extra layer of protection against minor shocks, cuts, and scrapes. They also help with grip.
- Safety Glasses: Dust, old bulb shards, or even spring clips snapping back could injure your eyes. Always wear safety glasses or goggles.
Identifying Your Recessed Light Bulb Type
This is often the trickiest part for first-timers, but it’s essential for knowing how to change a recessed light bulb and what replacement to buy. Not all recessed lights are created equal! You need to know what kind of bulb you’re dealing with to replace it correctly.
Standard Incandescent/Halogen (Screw-in)
These look very much like traditional light bulbs, but often have a reflector shape (like a spotlight). They screw into a standard E26 (medium base) or E12 (candelabra base) socket.
- Appearance: Often have a frosted or clear glass globe, sometimes with a reflective coating inside.
- Removal: Simply unscrew counter-clockwise.
- Replacement: Screw in clockwise.
GU10 Twist-and-Lock
Common in newer installations, especially for smaller, more focused light.
- Appearance: Two short, blunt pins on the base.
- Removal: Push up gently on the bulb, then twist counter-clockwise a quarter turn, and pull down.
- Replacement: Push up the new bulb into the socket, twist clockwise a quarter turn until it locks into place.
PAR/BR Bulbs (Screw-in)
These are common in recessed fixtures, especially for floodlighting or wider beams. They still screw in but have distinct shapes.
- PAR (Parabolic Aluminized Reflector): Identified by numbers (e.g., PAR20, PAR30, PAR38) that indicate their diameter in eighths of an inch. They have a more focused beam.
- BR (Bulged Reflector): Also identified by numbers (e.g., BR30, BR40), these have a wider beam spread and a softer, more diffused light.
- Removal/Replacement: Like standard screw-in bulbs, but they often have a more robust glass shell.
MR16 Pin-Type Bulbs
Small, often low-voltage bulbs, identifiable by their two sharp, thin pins at the base.
- Appearance: Small, often multifaceted reflector.
- Removal: Pull straight down from the socket. Sometimes held in place by a wire spring clip or a small retaining ring that needs to be unclipped first.
- Replacement: Align pins with holes and push straight up.
Integrated LED Fixtures (When Bulbs Aren’t Replaceable)
This is an important distinction! Some modern recessed lights don’t have a replaceable “bulb” at all. The LED light source is integrated directly into the fixture itself.
- How to Tell: If you don’t see an obvious bulb to unscrew or twist, or if the entire trim piece seems to be the light source, it’s likely an integrated LED.
- What to Do: If an integrated LED fixture fails, you usually have to replace the entire fixture (or at least the LED module, which might be interchangeable). This is a more involved task and often requires an electrician unless you’re comfortable with more complex wiring.
Specialty Bulbs
Less common but worth mentioning. You might encounter others like compact fluorescent (CFL) bulbs with screw-in bases, or other unique pin configurations. Always check the base and markings on the old bulb.
Gathering Your Tools and Supplies
Having everything ready before you start makes the job much smoother and safer. You don’t want to be halfway through, balancing on a ladder, and suddenly realize you need to go hunt for a specific tool.
The Right Replacement Bulb
This is crucial! Always match the new bulb to the old one’s specifications.
- Type: (e.g., A19, PAR30, GU10, MR16).
- Base: (e.g., E26, E12, GU10, Bi-pin).
- Wattage: Match the wattage or go lower for energy efficiency. Never exceed the fixture’s maximum wattage rating (it’s usually printed inside the can or on a sticker).
- Voltage: Most recessed lights are 120V, but some specialty low-voltage lights (like many MR16s) require a transformer. Ensure your replacement matches.
- Color Temperature (Kelvin): This dictates the “warmth” or “coolness” of the light (e.g., 2700K for warm white, 5000K for daylight).
- Brightness (Lumens): If you want more or less light, this is the number to look at.
- Dimmable: If your fixture is on a dimmer switch, make sure your new bulb is dimmable.
*Pro Tip: Take the old bulb with you to the store to ensure a perfect match!*
Ladder or Stool
As mentioned in the safety section, a stable platform is non-negotiable.
Gloves and Eye Protection
Always wear them. Your hands and eyes will thank you.
Suction Cup Tool (Optional, but helpful)
Some PAR or BR bulbs, especially those that are flush with the trim or very smooth, can be difficult to grip. A rubber suction cup tool designed for light bulbs can make removal and installation much easier, preventing accidental drops or breakage.
Pliers or Needle-Nose Pliers
Useful for gripping stubborn metal bases if a glass bulb breaks, or for manipulating spring clips that hold trim rings in place.
Screwdriver (if trim removal needed)
Some recessed light trims are secured with small screws, especially if they are older or more decorative. Have a basic set of Phillips and flathead screwdrivers on hand.
Damp Cloth (for cleaning)
A damp cloth (or a microfiber cloth) is excellent for wiping away dust and grime from the inside of the fixture or the trim ring before installing the new bulb. Just make sure the power is off and the cloth isn’t dripping wet!
Step-by-Step Guide: How to Change a Recessed Light Bulb
Alright, you’ve prepped, you’re safe, and you’ve got your tools. Let’s get this done!
Step 1: Prioritize Safety (Again!)
I can’t stress this enough: **confirm the power is off at the circuit breaker.** Use a non-contact voltage tester if you have one, or simply try the wall switch for the fixture. Better safe than sorry!
Step 2: Accessing the Bulb (Removing Trim if Necessary)
Many recessed fixtures have a trim ring that sits flush with the ceiling. This trim might need to be removed to access the bulb, especially if it’s a newer style or if the bulb is deeply recessed.
- Check for Clips/Springs: Gently pull down on the trim ring. Most are held in place by two or three spring clips that resemble tension springs or V-shaped wires. You’ll feel a slight resistance, then the trim should come down.
- Disconnect Wires (if applicable): Some trims have wires connecting them to the main fixture, usually with a quick-disconnect plug. If so, unplug them. This allows you to set the trim aside.
- Screw-in Trims: Less common, but some trims are screwed into the can. Look for small screws around the edge.
*Tip: If the bulb is exposed and easily accessible without removing the trim, you can skip this step!*
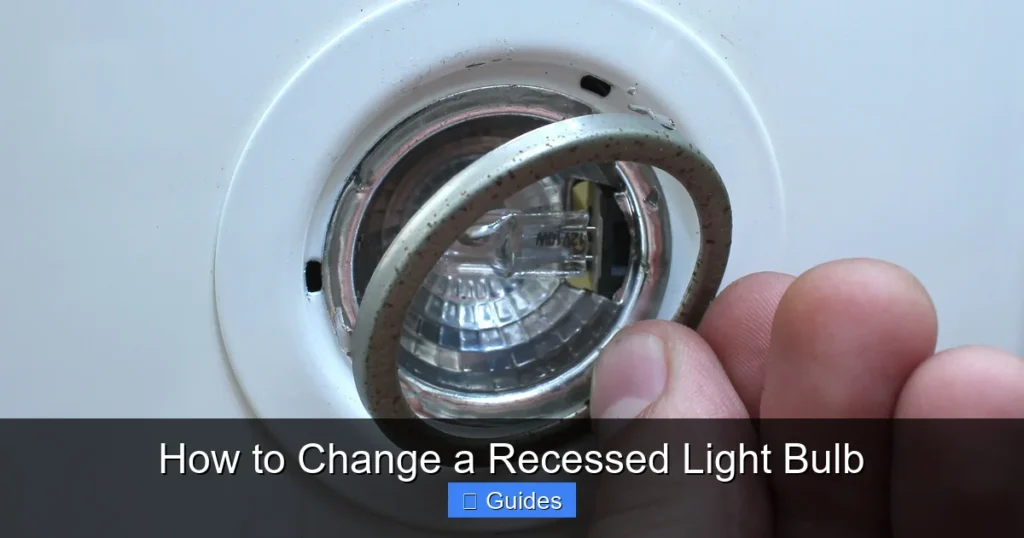
Step 3: Removing the Old Bulb (Different Types)
This is where knowing your bulb type comes in handy. Remember, the old bulb might be hot, even if the power is off, so wear gloves.
- For Standard Screw-in (A19, PAR, BR):
Grip the bulb firmly and twist it counter-clockwise until it unscrews completely. If it’s a PAR or BR bulb and hard to grip, use your suction cup tool.
Visual guide about How to Change a Recessed Light Bulb
Image source: honorservices.com
- For GU10 Twist-and-Lock:
Push the bulb gently upwards into the socket, then twist it counter-clockwise about a quarter turn. It should release, and you can pull it straight down.
- For MR16 Pin-Type:
These usually just pull straight down. If there’s a small retaining wire clip holding it, gently push the clip to the side or unhook it first. Be careful not to bend the pins.
- For Stubborn or Broken Bulbs:
If the glass portion of a screw-in bulb breaks, leaving the metal base in the socket, use needle-nose pliers to carefully grip the metal base and twist it counter-clockwise. Work slowly and wear thick gloves and eye protection to prevent cuts.
Once the old bulb is out, inspect the socket for any signs of damage or corrosion. If you see significant blackening, frayed wires, or anything unusual, it might be time to consult an electrician.
Step 4: Cleaning the Fixture (Optional but Recommended)
With the old bulb out and the power off, now is a great time to give the recessed can and trim ring a quick clean. Dust and cobwebs can accumulate, affecting light output and even posing a minor fire risk.
- Wipe Down: Use a slightly damp cloth to wipe the inside of the can and the trim ring.
- Dry Thoroughly: Ensure everything is completely dry before installing the new bulb.
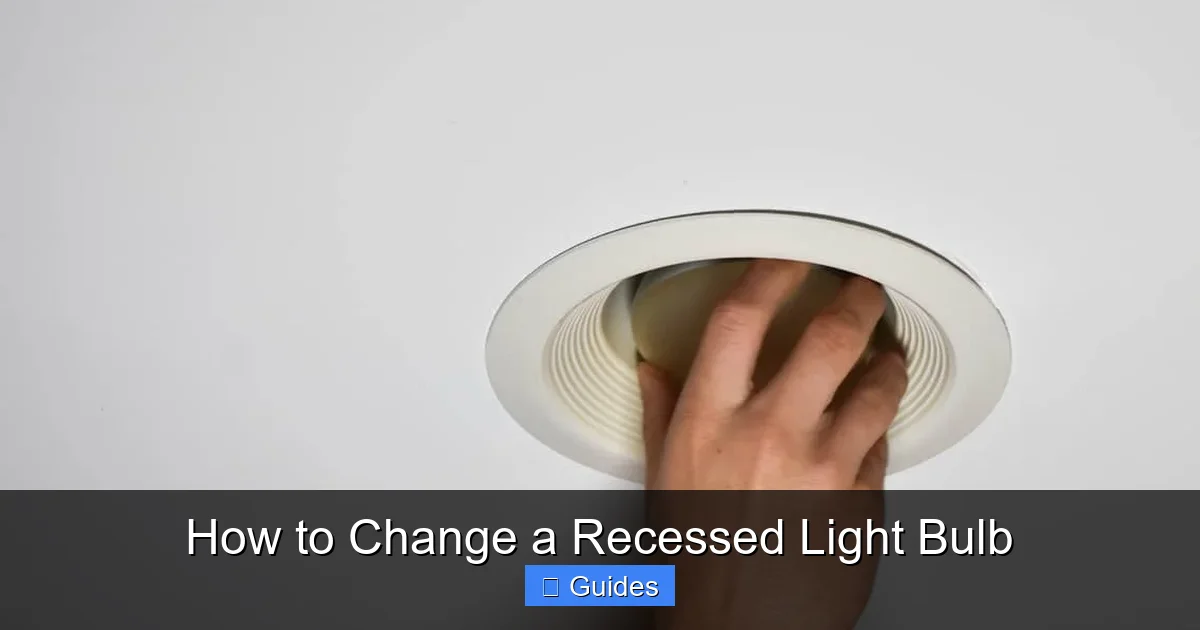
Step 5: Installing the New Bulb
Take your new bulb (remembering to match the type, wattage, and base!) and install it using the reverse of the removal process.
- For Screw-in Bulbs:
Align the base of the new bulb with the socket and gently screw it in clockwise. Don’t overtighten; just snug enough so it makes good contact.
- For Halogen Bulbs:
Always handle halogen bulbs with a clean cloth or gloves. The oils from your skin can create hot spots on the glass, leading to premature bulb failure or even breakage. Once installed, wipe the bulb gently with rubbing alcohol on a lint-free cloth if you accidentally touched it.
- For GU10 Twist-and-Lock:
Align the pins with the holes in the socket, push up gently, and twist clockwise a quarter turn until it locks firmly into place.
- For MR16 Pin-Type:
Carefully align the pins with the holes in the socket and push straight up until it’s secure. Reattach any retaining clips if present.
Step 6: Reassembling and Testing
You’re almost there!
- Reattach Trim: If you removed the trim ring, reconnect any wiring harnesses (if applicable) and push it back into the ceiling until the spring clips snap it firmly in place. Ensure it sits flush with the ceiling.
- Restore Power: Go back to your circuit breaker and flip the breaker back on.
- Test: Flip the wall switch for the light. Voila! Enjoy your newly illuminated space.
If the light doesn’t come on, don’t panic. Go back to the troubleshooting section below.
Troubleshooting Common Issues
Sometimes things don’t go perfectly the first time. Here are a few common hiccups and how to fix them when you change a recessed light bulb.
Bulb Won’t Come Out
- Too Tight: Try a rubber grip pad or the suction cup tool for screw-in bulbs.
- Corrosion: Older fixtures or those in damp environments (like bathrooms) can suffer from corrosion. Gentle wiggling and a bit more force might be needed. If it’s really stuck, try a penetrating oil like WD-40 on the threads (ensure power is off and allow time for it to evaporate before installing a new bulb).
- Broken Glass: If the glass breaks, leaving the metal base, use needle-nose pliers and extreme caution (gloves and eye protection!).
New Bulb Doesn’t Work
- Is the Power On? Double-check the breaker and the wall switch.
- Is the Bulb Seated Correctly? Unscrew/untwist the bulb and reinstall it, ensuring it’s making good contact. For screw-in bulbs, make sure it’s snug but not overtightened. For pin-type or GU10, ensure it’s fully inserted and locked.
- Is the Bulb Good? Sometimes you get a dud. Try another new bulb if you have one.
- Is it the Right Bulb? Double-check voltage, wattage, and base type. A 12V bulb won’t work in a 120V socket without a transformer, and vice-versa.
- Fixture Issue: If multiple new, correct bulbs don’t work, there might be a wiring issue in the fixture or the switch. At this point, it’s best to call a qualified electrician.
Trim Won’t Go Back On
- Spring Clips Misaligned: The most common issue. Ensure the spring clips are properly compressed and guided back into their slots inside the can. They can sometimes get twisted or caught.
- Obstruction: Check for any wires or insulation that might be preventing the trim from sitting flush.
Integrated LED Fixtures
If your fixture is an integrated LED and it stops working, unfortunately, there’s no bulb to change.
- Check for Replaceable Modules: Some integrated LED fixtures have a replaceable LED module that can be swapped out. Check the manufacturer’s instructions or model number for specifics.
- Fixture Replacement: More often, if the LED fails, the entire fixture needs to be replaced. This is a bigger job involving electrical wiring and is best left to an electrician unless you are very comfortable with home electrical work.
Conclusion
Congratulations! You’ve successfully learned how to change a recessed light bulb. This seemingly small task is a perfect example of how empowering a little DIY knowledge can be. You’ve saved yourself money, gained a new skill, and brightened your home all at once.
Remember, the key takeaways are always safety first (power off!), identifying your bulb type, and gathering the right tools. With these steps, changing any recessed light bulb will become a quick, stress-free routine. Go forth and conquer those dark spots – your home (and your wallet) will thank you!
Frequently Asked Questions
How often should I change a recessed light bulb?
The lifespan of a recessed light bulb varies significantly by type. Incandescent and halogen bulbs might last 1,000-2,000 hours, while CFLs can last around 8,000-10,000 hours. LED bulbs are the longest-lasting, often rated for 25,000-50,000 hours or more, meaning they might not need changing for many years.
Can I replace a recessed light bulb with a higher wattage?
No, you should never replace a recessed light bulb with a higher wattage than the fixture is rated for. Over-wattage can lead to overheating, which can damage the fixture’s wiring, cause fire hazards, or trip circuit breakers. Always check the maximum wattage rating printed inside the can or on a sticker.
What if the old recessed light bulb is stuck or broken?
If the bulb is stuck, try a rubber grip pad or a suction cup tool for better traction. For a broken screw-in bulb where the glass is gone but the metal base remains, always ensure the power is off at the breaker, then use needle-nose pliers to carefully grip the metal base and twist it counter-clockwise. Wear thick gloves and safety glasses for protection.
Is it normal for recessed light trim to get hot?
Some heat is normal, especially with incandescent or halogen bulbs, which produce a lot of heat. LED bulbs, however, generate much less heat. If the trim is excessively hot to the touch, or if you smell burning, it could indicate an issue like using an incorrect bulb wattage, poor ventilation, or faulty wiring, and you should turn off the power and investigate.
Can I change a recessed light bulb without turning off the power at the breaker?
No, it is highly recommended and safest to always turn off the power at the circuit breaker before attempting to change a recessed light bulb. Relying solely on the wall switch is risky, as parts of the fixture may still be live, posing a serious risk of electrical shock. Safety should always be your top priority.
What should I do with old recessed light bulbs?
Disposal methods vary by bulb type. Incandescent and halogen bulbs can usually be safely disposed of in regular household trash. CFLs (compact fluorescent lights) contain a small amount of mercury and should be recycled at designated collection points or household hazardous waste facilities. LED bulbs are generally safe for trash but are best recycled at electronics recycling centers due to their electronic components.