Transforming your home’s ambiance is easier than ever by learning how to change color of light bulb. Whether you opt for smart bulbs offering millions of hues, decorative gels, specialized paints, or simple colored replacements, there’s a safe and effective method for every need. Explore various techniques to customize your lighting and create the perfect mood for any occasion.
Ever walked into a room and felt an instant shift in your mood just by the lighting? It’s no secret that light has a powerful impact on how we feel and how we perceive our surroundings. From a cozy, warm glow that makes you want to curl up with a book, to a vibrant, energetic hue perfect for a party, the color of your light bulbs can completely transform the atmosphere of any space. You might be wondering, “How can I change color of light bulb to achieve these different moods?” Well, you’re in luck!
Gone are the days when a light bulb simply meant on or off, bright or dim. Today, we have a fantastic array of options for personalizing our lighting, making it easier than ever to create the perfect ambiance for every occasion, season, or mood. Whether you’re looking to add a pop of festive color for a holiday, set a relaxing tone for a movie night, or even improve focus in your home office, changing the color of your light bulbs is a fun and surprisingly simple way to update your home. Let’s dive into all the clever ways you can master how to change color of light bulb, from cutting-edge technology to creative DIY solutions.
Key Takeaways
- Smart Bulbs Offer Ultimate Versatility: The easiest and most dynamic way to change color of light bulb is by using smart LED bulbs, which allow for millions of color options, dimming, and scheduling via an app or voice control.
- Gels and Sleeves Provide Temporary Solutions: For a quick and non-permanent color change, colored gels, films, or silicone sleeves can be applied to existing bulbs, but always ensure they are heat-resistant and safely attached.
- DIY Painting Requires Caution: While possible to paint bulbs, it demands special high-heat paint and careful application to avoid fire hazards and toxic fumes. This method is generally discouraged for bulbs that generate significant heat.
- Pre-Colored Bulbs Are a Simple Swap: The simplest method for a static color is to replace your existing bulb with a new one that is already colored, available in various hues and bulb types.
- Fixture Filters Offer Integrated Solutions: Some light fixtures allow for the addition of colored lenses or filters, providing a more permanent and integrated color change to the emitted light.
- Safety is Paramount: Regardless of the method chosen to change color of light bulb, always prioritize safety, considering bulb heat, material flammability, and proper electrical practices.
- Consider Bulb Type: The best method to change color of light bulb often depends on the type of bulb you have (incandescent, LED, CFL) and its heat output. LED bulbs are generally the safest for most color-changing accessories.
Quick Answers to Common Questions
What’s the safest and easiest way to change light bulb color?
The safest and easiest method is to use smart LED bulbs, which allow you to control millions of colors via an app or voice command without physically altering the bulb.
Can I paint any light bulb to change its color?
No, you should only paint low-heat LED bulbs, and only with special high-heat enamel or stained glass paint. Painting incandescent or halogen bulbs is dangerous due to extreme heat, which can cause fire, fumes, or breakage.
Are smart colored light bulbs expensive?
While often more expensive than traditional bulbs, smart colored LED bulbs have become much more affordable. Their energy efficiency and long lifespan also offer savings over time.
Can I make my regular white light bulb produce dim light?
Yes, many regular white light bulbs are “dimmable” if used with a compatible dimmer switch. However, this only controls brightness, not color. To change both brightness and color, smart bulbs are ideal.
How long do colored gels or sleeves typically last on a bulb?
The lifespan of colored gels or sleeves depends on the material quality and the heat output of the bulb. With low-heat LED bulbs and high-quality, heat-resistant materials, they can last for a long time, but may fade or degrade over several months or years.
📑 Table of Contents
- The Smart Bulb Revolution: Effortless Color at Your Fingertips
- Temporary Transformation: Light Bulb Gels, Sleeves, and Films
- The DIY Approach: Painting Your Light Bulbs (With Caution!)
- Simple Swap: Replacing with Pre-Colored Light Bulbs
- Integrated Solutions: Light Fixture Filters and Lenses
- Advanced Considerations and Safety First
- Conclusion
The Smart Bulb Revolution: Effortless Color at Your Fingertips
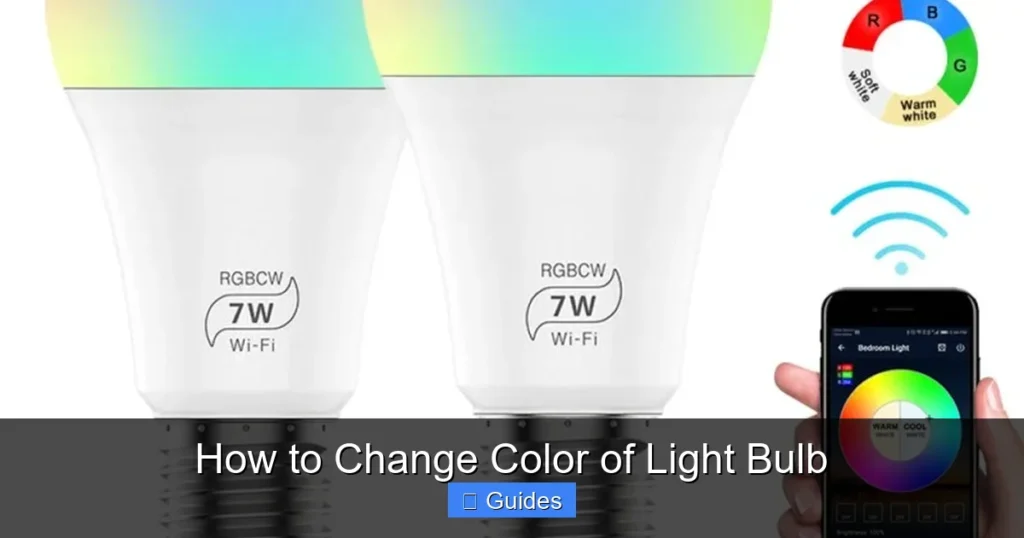
When you think about how to change color of light bulb with the most flexibility and ease, smart bulbs are usually the first solution that comes to mind. These high-tech wonders have revolutionized home lighting, putting millions of colors and various shades of white light right at your command. Smart bulbs are the ultimate tool for anyone looking to truly customize their lighting experience without a lot of fuss.
What Makes Smart Bulbs So Smart?
At their core, smart bulbs are LED (Light Emitting Diode) bulbs that contain a microchip, allowing them to connect to your home’s Wi-Fi network or Bluetooth. This connectivity is what makes them so “smart.” Through a dedicated app on your smartphone or tablet, you can control various aspects of the bulb: turn it on/off, dim it, schedule it, and most importantly, change its color. Many smart bulbs offer a palette of over 16 million colors, along with a range of tunable white light, from cool, crisp daylight to warm, inviting amber tones. Some even sync with music or movies, adding an immersive layer to your entertainment.
Setting Up Your Smart Lighting System
Getting started with smart bulbs is usually quite straightforward. First, you’ll need to screw the smart bulb into any standard light fixture, just like a regular bulb. Next, you’ll download the manufacturer’s app on your mobile device. The app will then guide you through the process of connecting the bulb to your home network. Many smart bulb systems also offer compatibility with smart home assistants like Amazon Alexa, Google Assistant, or Apple HomeKit, allowing you to change color of light bulb with simple voice commands. Imagine saying, “Alexa, turn the living room lights blue,” and watching your room transform instantly!
Choosing the Right Smart Bulbs for Your Home
There are many brands of smart bulbs available, each with slightly different features and ecosystems. Popular brands include Philips Hue, Sengled, Wyze, Govee, and LIFX, among others. When choosing, consider factors like:
- Connectivity: Do you prefer Wi-Fi direct, Bluetooth, or a hub-based system (like Philips Hue Bridge)?
- Color Accuracy and Brightness: Check reviews for how true-to-life the colors are and the maximum brightness (lumens).
- Ecosystem Compatibility: Will they work with your existing smart home devices or voice assistants?
- Features: Do you need music sync, geofencing, or specific preset scenes?
Investing in smart bulbs is often the most versatile and safest way to frequently change color of light bulb, offering unparalleled control and creative possibilities.
Temporary Transformation: Light Bulb Gels, Sleeves, and Films
Perhaps you’re not ready to dive into smart home technology, or you only need to change color of light bulb for a specific event or a short period. In that case, colored gels, silicone sleeves, or adhesive films offer a fantastic, non-permanent solution. These accessories are perfect for adding a splash of color for parties, holidays, or creating themed lighting in a kid’s room.
Visual guide about How to Change Color of Light Bulb
Image source: img.freepik.com
Understanding Gels and Sleeves
Colored Gels (or Filters): These are thin sheets of heat-resistant, colored plastic (often polycarbonate or polyester) typically used in stage lighting, photography, and theatrical productions. They come in a vast array of colors and can be cut to size to fit various light fixtures or placed over individual bulbs.
Silicone Sleeves: These are flexible, colored silicone covers that slip directly over a light bulb. They are designed to withstand heat and come in standard bulb shapes (like A19 or BR30), making them easy to install and remove.
Adhesive Films: Similar to gels, these are colored films with an adhesive backing that can be cut and stuck directly onto the glass of a light fixture or, with extreme caution, the bulb itself (though this is generally less recommended due to potential heat issues and residue).
How to Apply Gels and Sleeves Safely
Safety is absolutely critical when adding anything to a light bulb, especially if it generates heat.
- Choose the Right Bulb: This method works best with LED bulbs, as they produce very little heat compared to traditional incandescent or halogen bulbs. If you must use them with incandescent bulbs, ensure the gels/sleeves are specifically rated for high heat and leave ample air circulation. Never use these on halogen bulbs due to extreme heat.
- Ensure a Secure Fit: For gels, you might need to use heat-resistant clips, tape, or a fixture frame to hold them in place, ensuring they don’t touch the bulb directly if it gets hot. Silicone sleeves are designed to fit snugly.
- Ventilation: Make sure there’s enough space around the bulb for heat to dissipate, even with LED bulbs.
- Read Product Instructions: Always follow the manufacturer’s guidelines for installation and bulb compatibility.
The beauty of these solutions is their temporary nature; you can easily swap out colors as often as you like, providing a flexible way to change color of light bulb without permanent alterations.
Creative Uses and Considerations
- Party Ambiance: Instantly transform a room for a birthday or themed party with vibrant reds, blues, or greens.
- Holiday Decor: Add festive colors for Christmas, Halloween, or Valentine’s Day without buying specific holiday lights.
- Accent Lighting: Use gels in spotlights or floodlights to highlight artwork, plants, or architectural features with a specific hue.
- Photography/Videography: Gels are a staple for controlling light temperature and adding creative color effects to shoots.
While gels and sleeves are excellent for temporary changes, remember that they can slightly reduce the overall brightness of the bulb. Always prioritize safety, especially regarding heat and material flammability.
The DIY Approach: Painting Your Light Bulbs (With Caution!)
For the truly adventurous and budget-conscious, the idea of painting a light bulb to change its color might seem appealing. It’s certainly a creative DIY project, but it comes with a strong word of caution. This method is generally recommended only for bulbs that produce very little heat, such as LED bulbs, and requires specific types of paint. Attempting to paint traditional incandescent bulbs can be dangerous due to the high heat they generate.
What You’ll Need for Bulb Painting
- LED Light Bulbs: These are the safest choice for painting due to their low heat output.
- High-Heat Enamel Paint or Stained Glass Paint: Regular craft paint will bubble, chip, or potentially even emit fumes or ignite when heated. You must use paints designed to withstand high temperatures. Stained glass paint is often a good choice as it’s formulated for transparency and heat resistance.
- Small Paint Brushes or Sponges: For application.
- Rubbing Alcohol and Cloth: To clean the bulb surface.
- Protective Gloves and Mask: To protect your hands and avoid inhaling paint fumes.
- Drop Cloth or Newspaper: To protect your work surface.
- A Well-Ventilated Area: Essential for painting and drying.
Step-by-Step Guide to Painting Light Bulbs
If you decide to proceed with painting your LED bulbs, follow these steps meticulously:
- Clean the Bulb: Carefully wipe the glass surface of the LED bulb with rubbing alcohol to remove any oils or dust. Let it dry completely.
- Prepare Your Workspace: Lay down a drop cloth in a well-ventilated area. Don your gloves and mask.
- Apply the First Coat: Using a small brush or sponge, apply a thin, even layer of your chosen high-heat or stained glass paint to the glass part of the LED bulb. Avoid painting the metal base, as this can interfere with electrical contact or heat dissipation.
- Dry Thoroughly: Allow the first coat to dry completely according to the paint manufacturer’s instructions. This usually takes several hours. You might need to gently suspend the bulb or place it on a non-stick surface.
- Apply Additional Coats (If Needed): For a deeper, more opaque color, apply additional thin coats, allowing each to dry fully between applications.
- Cure the Paint: Some high-heat paints require a “curing” process, which might involve baking the painted item at a low temperature. Only do this if the paint manufacturer’s instructions specifically state it for bulbs and you are certain your LED bulb can withstand it. Otherwise, air-drying is safer.
- Test Carefully: Once fully dry and cured (if applicable), screw the bulb into a fixture and turn it on to check the color and observe for any unusual smells or smoke. If anything seems amiss, turn it off immediately.
Crucial Safety Warnings and When to Avoid Painting
Never paint incandescent or halogen bulbs. These bulbs reach extremely high temperatures (hundreds of degrees Fahrenheit), which can cause regular paint to bubble, peel, ignite, release toxic fumes, or even shatter the glass. Even with LED bulbs, there are risks:
- Fire Hazard: Using the wrong type of paint or applying too thick a coat can create a flammable surface.
- Toxic Fumes: Paint can release harmful chemicals, especially when heated.
- Reduced Lifespan: Paint can trap what little heat LED bulbs produce, potentially shortening their lifespan.
- Uneven Color: Achieving a perfectly even, streak-free color can be challenging.
While it’s a creative way to change color of light bulb, painting is generally a last resort and should only be considered for very low-heat LED bulbs, using appropriate materials, and with the utmost attention to safety.
Simple Swap: Replacing with Pre-Colored Light Bulbs
One of the most straightforward and safest ways to change color of light bulb is simply to replace your existing bulb with one that is already manufactured in a specific color. This method requires no DIY skills, no special equipment beyond a step stool (if needed), and offers instant, consistent color.
Exploring Different Types of Colored Bulbs
Colored light bulbs come in various forms to suit different needs and fixtures:
- Colored LED Bulbs: These are the most common and energy-efficient. They consume very little power, produce minimal heat, and are available in a wide spectrum of fixed colors (red, blue, green, amber, etc.), as well as specific shades of white (warm white, cool white, daylight). They are durable and long-lasting.
- Colored Incandescent Bulbs: While less energy-efficient, these still exist, particularly for decorative purposes or novelty lighting. The color is usually achieved by coating the glass with a colored film or pigment. They generate significant heat.
- Colored CFL (Compact Fluorescent Lamp) Bulbs: Less common than LED or incandescent, some CFLs are available in specific colors, primarily for accent lighting.
- Specialty Bulbs: This category includes things like blacklight (UV) bulbs, bug-repellent yellow bulbs, and salt lamp bulbs designed to emit a specific warm glow.
Matching Color to Mood and Purpose
Choosing the right pre-colored bulb means thinking about the atmosphere you want to create:
- Red: Evokes warmth, passion, and excitement. Great for romantic settings or dramatic accents.
- Blue: Creates a calming, cool, or mysterious atmosphere. Often used for relaxation spaces or evening ambiance.
- Green: Associated with nature, tranquility, and balance. Ideal for creating a serene environment.
- Yellow/Amber: Warm, inviting, and cozy. Mimics candlelight or a sunset, perfect for living areas or bedrooms.
- Purple: Can be regal, creative, or mystic. Good for accent lighting or unique party themes.
When selecting a colored replacement, ensure it has the correct base (e.g., E26, E12) and wattage equivalent for your fixture. LED bulbs often list their “equivalent wattage” to help you choose appropriate brightness.
Installation and Maintenance Tips
Installation is as simple as unscrewing the old bulb and screwing in the new one. Always ensure the power to the fixture is off before changing any bulb. For maintenance, colored LED bulbs are generally maintenance-free and last for many years. If you’re using incandescent colored bulbs, be aware they will need more frequent replacement due to their shorter lifespan.
This method is foolproof for how to change color of light bulb if you’re looking for a consistent, single color that you don’t plan to change frequently.
Integrated Solutions: Light Fixture Filters and Lenses
Sometimes, the color change isn’t about the bulb itself, but rather about the light fixture. For certain types of lighting, particularly recessed lights, track lighting, or some outdoor fixtures, you might find options to incorporate colored filters or lenses directly into the fixture’s design. This offers a more permanent and seamless way to change the color of the emitted light.
How Fixture Filters Work
These filters are typically made of tempered glass or high-quality heat-resistant plastic, similar to professional lighting gels but often more rigid and designed to fit specific fixture openings. They sit between the light bulb and the room, effectively coloring the light as it passes through. Because they are integrated into the fixture, they often look cleaner and more professional than external gels or painted bulbs.
Identifying Compatible Fixtures
Not all light fixtures are designed to accommodate filters or lenses. This method is most common with:
- Recessed Can Lights: Many recessed fixtures have a “trim kit” that includes a bezel and sometimes a lens or reflector. Some of these kits can be swapped out for versions that accept colored filters or come with a colored lens already.
- Track Lighting: Certain track light heads have slots or clips to hold small colored gels or lenses.
- Landscape Lighting: Outdoor spotlights and floodlights often have accessories for adding colored filters to change the appearance of your garden or home exterior.
- Stage or Architectural Lighting: Professional-grade fixtures are almost always designed with gel frames for precise color control.
Check the specifications or manual of your existing fixtures to see if they are compatible with color filters or if there are alternative trim kits available that include colored lenses. If you’re planning a new installation, consider fixtures that offer this flexibility.
Installation: A Step Beyond the Bulb
Installing fixture filters is generally more involved than just screwing in a bulb. You might need to:
- Remove the Trim: For recessed lights, this often means twisting or unlatching the existing trim from the ceiling.
- Insert the Filter: The colored filter or lens is then placed into a dedicated slot or held in place by clips within the fixture or the new trim.
- Reinstall the Trim: Secure the trim back into the ceiling or fixture.
Always turn off the power to the fixture at the circuit breaker before attempting any installation. If you’re unsure, it’s always best to consult with an electrician or a lighting professional. This method provides a durable and integrated way to change color of light bulb effect, especially for applications where consistent, long-term color is desired.
Advanced Considerations and Safety First
Beyond the common methods we’ve explored, there are a few other ways to think about coloring light, along with crucial safety reminders that apply to all approaches.
Beyond the Basics: Other Color-Changing Technologies
- LED Strip Lights: While not technically changing the color of a traditional “bulb,” LED strip lights are a fantastic way to add dynamic, color-changing ambient light to almost any space. They are flexible, often adhesive-backed, and can be hidden under cabinets, behind TVs, or along coves for indirect, customizable lighting effects. Most come with remote controls or app integration for color selection.
- DMX Lighting Systems: For professional-grade installations (think stages, clubs, or large architectural projects), DMX (Digital Multiplex) lighting systems offer precise, synchronized control over multiple color-changing fixtures. This is typically beyond the scope of a home DIY project but represents the pinnacle of lighting control.
Universal Safety Guidelines for Any Method
No matter which technique you choose to change color of light bulb, always keep safety at the forefront:
- Turn Off Power: Always turn off the power to the light fixture at the wall switch AND the circuit breaker before installing, removing, or modifying a light bulb or fixture.
- Read Instructions: Carefully read and follow all manufacturer instructions for bulbs, paints, gels, and fixtures.
- Check Heat Output: Be acutely aware of how much heat a bulb produces. Incandescent and halogen bulbs get extremely hot and are generally unsuitable for any external modifications like gels or paint due to fire risk. LED bulbs are much safer for such applications.
- Ventilation: Ensure adequate airflow around any modified bulb or fixture to prevent heat buildup, especially if using external covers or paint.
- Material Compatibility: Only use materials (gels, paints) specifically rated for use with lighting or high temperatures. Regular craft supplies are almost never appropriate.
- Electrical Safety: If you are working with fixture wiring or any component beyond simply screwing in a bulb, and you are not confident in your electrical knowledge, consult a qualified electrician.
- Fume Awareness: When painting, ensure proper ventilation to avoid inhaling potentially harmful fumes.
Choosing the Best Method for Your Needs
The “best” way to change color of light bulb depends entirely on your goals:
- For maximum flexibility and ease of use: Smart LED bulbs.
- For temporary, specific effects or events: Colored gels, films, or silicone sleeves (best with LED bulbs).
- For a consistent, single color with minimal effort: Pre-colored replacement bulbs.
- For an integrated, long-term color accent in specific fixtures: Light fixture filters or lenses.
- For a unique DIY project (with caution): Painting low-heat LED bulbs with special paint.
Consider your budget, technical comfort level, and the desired longevity of the color change when making your decision.
Conclusion
As you can see, knowing how to change color of light bulb opens up a world of creative possibilities for transforming your home. From the high-tech convenience of smart bulbs that offer millions of hues, to the simple elegance of pre-colored replacements, and even the adventurous path of DIY painting (with proper precautions!), there’s a method for every homeowner and every desired ambiance.
The power of light to influence mood and perception is truly remarkable. By embracing these techniques, you’re not just changing a bulb; you’re crafting an experience, personalizing your space, and enhancing your everyday life. Always remember to prioritize safety above all else, especially when dealing with heat and electricity. So go ahead, experiment, have fun, and illuminate your world in a whole new spectrum of color!
Frequently Asked Questions
Why would someone want to change the color of a light bulb?
People change light bulb colors to set different moods or ambiances in a room, for festive decorations, or to enhance specific activities. For instance, warm colors like red can create a cozy atmosphere, while cool colors like blue can be calming or energizing.
What’s the main difference between using smart bulbs and simply buying pre-colored bulbs?
Smart bulbs offer dynamic control, allowing you to change between millions of colors, dimming, and even scheduling from an app or voice command. Pre-colored bulbs, on the other hand, provide a fixed, static color that cannot be changed once installed.
Are colored gels or silicone sleeves safe to use on all types of light bulbs?
No, colored gels and silicone sleeves are generally only safe for use with low-heat LED bulbs. Incandescent and halogen bulbs produce too much heat, which can melt, burn, or create a fire hazard with these materials. Always check the product’s heat rating and bulb compatibility.
Is it possible to change a bulb’s color without buying new hardware or making permanent alterations?
Yes, using colored gels, films, or silicone sleeves is a temporary and non-permanent way to change a bulb’s color without new hardware (beyond the gels/sleeves themselves). However, for frequent or dynamic color changes, smart bulbs are the most convenient option.
How does colored light affect mood or productivity?
Different colored lights can significantly impact mood and productivity. Warm colors (red, orange, yellow) tend to create feelings of comfort, energy, or excitement. Cool colors (blue, green) are often associated with calmness, focus, or nature. Specific shades can even influence sleep patterns or concentration.
What tools or materials are typically needed for a DIY light bulb color change project?
For a DIY color change using gels/sleeves, you’ll need the heat-resistant material itself, scissors, and possibly heat-resistant tape or clips. If painting, you’ll need low-heat LED bulbs, specialized high-heat enamel or stained glass paint, brushes, and protective gear like gloves and a mask, all used in a well-ventilated area.