Encountering a broken light bulb can be frustrating and even dangerous, but it’s a fixable problem. This guide provides step-by-step instructions on how to safely remove a broken light bulb, emphasizing power disconnection, protective gear, and the right tools. You’ll learn various techniques, from using a potato to needle-nose pliers, ensuring you can tackle different types of breaks with confidence and minimize risks.
How to Remove a Broken Light Bulb
Picture this: you’re trying to replace a burnt-out light bulb, perhaps in a dusty corner lamp or a high ceiling fixture. You twist, it resists, and then… *CRACK!* The glass bulb separates from its metal base, leaving a jagged, dangerous mess stuck firmly in the socket. It’s a common household mishap, and one that can send a shiver down your spine. Exposed wires, sharp glass, and the potential for a nasty shock make this situation seem daunting, even for the most seasoned DIY enthusiast.
Don’t panic! While a broken light bulb can certainly be intimidating, it’s a problem that can be safely and effectively resolved with the right approach, a few common tools, and a healthy dose of patience. This comprehensive guide is here to walk you through every step, ensuring you know exactly how to remove a broken light bulb without risking injury or further damage. We’ll cover everything from crucial safety precautions to various removal techniques, empowering you to tackle this tricky task with confidence.
So, take a deep breath. Before you reach for that duct tape or consider calling an electrician for a single broken bulb, let’s learn how to safely extract that stubborn shard and get your lights working again. We’ll show you exactly how to remove a broken light bulb, making what seems like a big problem a simple fix.
Key Takeaways
- Safety First: Always disconnect power to the fixture at the breaker and wear appropriate protective gear (gloves, eye protection) before attempting to remove a broken light bulb.
- Assess the Break: The condition of the broken bulb (e.g., exposed metal base, shards of glass, deeply recessed) dictates the best removal method and tools required.
- Gather the Right Tools: Essential tools may include needle-nose pliers, regular pliers, a potato or apple, a screwdriver, safety glasses, heavy-duty gloves, and a flashlight.
- Multiple Removal Methods: Learn techniques like the “potato method” for clean breaks, using pliers for exposed metal bases, or a screwdriver/needle-nose pliers for more challenging, fragmented situations.
- Work Slowly and Carefully: Rushing increases the risk of injury. Take your time with each step, applying gentle pressure and assessing your progress.
- Post-Removal Protocol: After successfully removing the broken bulb, clean up any glass shards thoroughly, dispose of them safely, and inspect the socket for damage before installing a new bulb.
- Prevention is Key: Avoid future broken bulbs by not overtightening new bulbs, using the correct wattage, and handling bulbs carefully during installation.
Quick Answers to Common Questions
Can I remove a broken light bulb without turning off the power?
No, absolutely not. Attempting to remove a broken light bulb from a live socket is extremely dangerous and can lead to electric shock or fire. Always disconnect power at the circuit breaker first.
What if I don’t have a potato for the potato method?
A firm apple can work as a substitute for the potato method. Ensure it’s firm enough to embed the metal base for grip.
What if the broken bulb base is really stuck?
If the base is extremely stubborn or you feel unsafe, stop. It’s better to call a qualified electrician who has specialized tools and expertise to handle difficult removals without damaging the fixture.
How do I prevent the new bulb from breaking when I install it?
Avoid overtightening the new bulb. Screw it in until it’s snug, then give it just a tiny additional quarter turn. Too much force can stress the glass or base.
What if I accidentally cut myself on the glass?
Immediately stop working. Clean the wound thoroughly with soap and water. If the cut is deep, bleeding heavily, or you suspect glass fragments remain, seek medical attention.
📑 Table of Contents
- Safety First: Your Top Priority When Removing a Broken Light Bulb
- Assessing the Damage: What Kind of Break Are We Dealing With?
- Tools of the Trade: What You’ll Need
- Step-by-Step Removal Methods: How to Remove a Broken Light Bulb
- Post-Removal Checklist: What to Do Next
- Prevention is Key: Avoiding Future Breaks
- Conclusion
Safety First: Your Top Priority When Removing a Broken Light Bulb
Before you even *think* about touching that broken bulb, safety must be your absolute number one concern. Electricity and broken glass are a dangerous combination, and neglecting proper precautions can lead to serious injury. This isn’t a step to rush or skip.
Disconnect the Power Source
This is the most critical step. Never, ever attempt to remove a broken light bulb from a live socket.
- Turn off the light switch: Start by flipping the light switch to the “off” position. This is good practice, but it’s *not* enough to guarantee safety.
- Go to your electrical panel: Locate your home’s main electrical panel (often in a basement, garage, or utility closet). Find the circuit breaker that controls the light fixture where the bulb broke. If your panel isn’t clearly labeled, you might need to flip breakers one by one until the light in question (or nearby lights) goes out.
- Flip the breaker: Firmly switch the corresponding breaker to the “off” position. Consider placing a piece of tape or a “DO NOT TOUCH” sign over it to prevent anyone from accidentally turning it back on while you’re working.
- Verify power is off: Before proceeding, it’s wise to use a non-contact voltage tester to confirm that no power is flowing to the socket. Simply hold the tester near the socket; if it remains silent and doesn’t light up, the power is truly off.
Gear Up for Protection
Once the power is confirmed off, it’s time to protect yourself from sharp glass and potential electrical surprises (though the latter should be minimized by turning off the breaker).
- Wear heavy-duty gloves: Standard household rubber gloves won’t cut it. You need thick work gloves, leather gloves, or even gardening gloves that can protect your hands from jagged glass edges.
- Protect your eyes: Safety glasses or goggles are non-negotiable. Glass shards can fly unexpectedly, especially if the bulb shatters further during removal.
- Consider long sleeves: If working overhead, wearing a long-sleeved shirt can offer additional protection for your arms against falling glass dust or small fragments.
- Stable footing: If the fixture is high, use a sturdy step stool or ladder. Don’t stand on wobbly chairs or precarious surfaces. Ensure someone is spotting you if necessary.
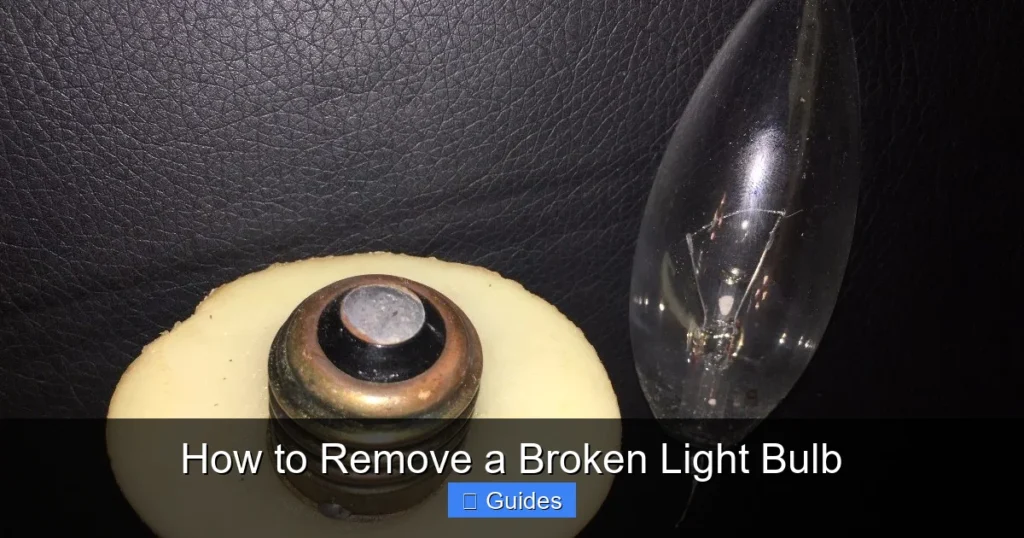
Assessing the Damage: What Kind of Break Are We Dealing With?

Visual guide about How to Remove a Broken Light Bulb
Image source: i.ytimg.com
Before you grab any tool, take a moment to look at the broken bulb. The nature of the break will largely determine the safest and most effective method for its removal.
Exposed Metal Base with Clean Break
This is the “best-case scenario.” The glass bulb has cleanly separated from the metal screw base, leaving the threaded metal base largely intact and exposed. There might be some small shards clinging to the edge, but the main structure of the base is still there.
Jagged Glass Shards Around the Base
More common is a break where glass fragments remain attached to the metal base, creating a jagged, dangerous rim. The metal base itself might be slightly distorted.
Deeply Recessed or Fragmented Bulb
This is the most challenging situation. The bulb might have shattered deep within the socket, leaving very little of the metal base exposed or making it difficult to grip. You might only see small pieces of glass or even just the filament.
Important Note on Socket Type
Most common household bulbs are incandescent, CFL, or LED, and they use an Edison screw base. This guide primarily focuses on removing these types of broken bulbs. If you have a different type of bulb (e.g., a halogen capsule, a fluorescent tube, or a bayonet fitting), the removal method may vary, and it might be best to consult a professional or your fixture’s manual.
Tools of the Trade: What You’ll Need
Having the right tools at hand makes the job much safer and easier. Gather these items *before* you start.
Essential Tools
- Heavy-duty work gloves: As mentioned, crucial for hand protection.
- Safety glasses/goggles: To protect your eyes from flying glass.
- Non-contact voltage tester: To confirm power is off.
- Flashlight: To illuminate the socket, especially if it’s in a dark area.
Specialized Removal Tools (choose based on assessment)
- Needle-nose pliers: Excellent for gripping small, tight areas, or for prying out small pieces.
- Regular pliers (slip-joint or tongue-and-groove): Useful for gripping a more substantial metal base.
- Potato or apple: A surprising but effective tool for clean breaks. Choose one that’s slightly smaller than the bulb’s base.
- Screwdriver (flathead): Can be used to gently pry or twist the metal base if there’s a good lip to catch. Insulated screwdrivers are preferred for safety, even with power off.
- Lint roller or duct tape: For picking up tiny glass fragments after removal.
- Vacuum cleaner with hose attachment: For thorough cleanup of glass.
- Small container (e.g., glass jar or thick plastic container): For safe disposal of broken glass.
Step-by-Step Removal Methods: How to Remove a Broken Light Bulb
With safety precautions in place and tools at the ready, let’s explore the different techniques for removing that broken light bulb. Remember to work slowly and carefully, always prioritizing safety.
Method 1: The Potato/Apple Method (for Clean Breaks)
This method is surprisingly effective for when the glass bulb has broken off cleanly, leaving most of the metal screw base exposed and intact.
1. Prepare your “tool”: Take a medium-sized potato or a firm apple. Cut it in half, ensuring you have a flat, clean surface. The cut surface should be slightly smaller than the diameter of the bulb’s metal base.
2. Press firmly: Carefully, but firmly, press the cut surface of the potato or apple into the exposed metal base of the broken bulb. You want to embed the metal edges into the potato/apple flesh.
3. Twist counter-clockwise: Once the potato/apple is firmly seated, slowly and gently twist it counter-clockwise. The potato’s flesh should provide enough grip to unscrew the metal base from the socket.
4. Remove and inspect: Once the base is unscrewed, carefully pull it straight out. Inspect the socket for any remaining glass shards or damage. Dispose of the potato/apple and the embedded bulb base safely.
Tip: If the potato doesn’t grip immediately, try rotating it slightly while pressing to find a better purchase on the metal threads.
Method 2: The Pliers Method (for Exposed Metal Base with Some Glass)
This is often the go-to method when there’s an exposed metal base, possibly with some stubborn glass fragments around the edge, making the potato method less viable.
1. Choose your pliers: Needle-nose pliers are excellent for precision and getting into tight spaces. Regular pliers can work if you have a good amount of the metal base to grip.
2. Clear loose glass (carefully): If there are large, easily removable glass shards, gently pick them out with your gloved fingers or needle-nose pliers first. Be extremely cautious not to push glass deeper into the socket.
3. Grip the metal base: With your chosen pliers, carefully grip the *outer rim* of the metal screw base. Avoid gripping the inner part where threads or wires might be exposed, as this could bend the base and make removal harder.
4. Twist gently: Apply steady, gentle counter-clockwise pressure. You might need to make small, incremental twists if the base is stubborn or misshapen. Avoid squeezing too hard, as you could deform the base further or cause it to collapse, making it harder to remove.
5. Work around the base: If you can’t get a full grip, try gripping a small section, twisting a bit, then re-gripping another section and twisting again. Work your way around the circumference until the base starts to unscrew.
6. Remove and inspect: Once the base is loose, gently pull it out with the pliers. Again, inspect the socket for any remaining debris.
Tip: If the metal base is very thin or flimsy, use both hands – one to hold the pliers firmly, the other to gently guide the twisting motion.
Method 3: The Screwdriver/Needle-Nose Pliers Method (for Deeper Breaks or Fragments)
This method is for more challenging situations where the bulb has shattered deeper inside the socket, leaving little or no exposed metal base, or just fragments. This requires the most caution.
1. Visibility is key: Use a flashlight to get a clear view inside the socket. Identify any remaining metal or glass.
2. Flathead screwdriver technique:
* Choose a flathead screwdriver with a tip that fits inside the metal base without touching the center contact point.
* Carefully insert the screwdriver tip into the *side* of the metal base, aiming to catch an edge or a piece of the threaded metal.
* Gently pry outwards and simultaneously twist counter-clockwise. The goal is to get the screwdriver to bite into the metal and then use that leverage to unscrew the base.
* Be *extremely* careful not to damage the inner contact point or the ceramic/plastic of the socket itself.
3. Needle-nose pliers for fragments:
* If there are only small, scattered pieces of the metal base or glass, needle-nose pliers can be used to carefully extract them one by one.
* Grip each fragment firmly and twist or pull it out.
* This can be a tedious process, but patience is crucial to avoid leaving sharp edges.
4. Combination approach: You might need to combine these techniques – using a screwdriver to loosen a piece, then needle-nose pliers to extract it.
5. Frequent inspection: Continually check inside the socket with your flashlight to ensure you’ve removed all fragments and that the socket itself hasn’t been damaged.
Warning: This method carries the highest risk of damaging the socket or injuring yourself. Proceed with extreme caution. If you are uncomfortable or suspect damage to the socket, stop and consider calling a qualified electrician.
Post-Removal Checklist: What to Do Next
Congratulations! You’ve successfully removed the broken light bulb. But the job isn’t quite finished yet.
Clean Up Thoroughly
Small shards of glass can be insidious.
- Use a flashlight: Shine a flashlight around the area where the bulb broke and where you were working. Tiny fragments are often invisible until illuminated from an angle.
- Vacuum: Use a vacuum cleaner with a hose attachment to thoroughly clean the socket area, the floor, and any nearby surfaces.
- Tape/Lint Roller: For very fine dust or tiny shards, use a piece of duct tape (sticky side out) or a lint roller to pick up any remaining fragments.
- Wipe down: Wipe the socket and fixture with a damp cloth (ensure power is still off!) to catch any remaining dust.
Safe Disposal of Broken Glass
Don’t just toss broken glass into your regular trash bin.
- Containerize: Place all broken glass shards and the removed bulb base into a sturdy container that won’t easily puncture, such as a thick plastic bottle, a cardboard box reinforced with tape, or a dedicated “sharps” container.
- Label: Clearly label the container as “BROKEN GLASS” to alert sanitation workers.
- Dispose: Follow your local regulations for disposing of hazardous or sharp waste.
Inspect the Socket
Before installing a new bulb, give the socket a good once-over.
- Look for damage: Check for cracks in the porcelain or plastic, bent metal tabs, or exposed wires. If you see any signs of damage, do not install a new bulb. The socket may need to be replaced by a qualified electrician.
- Check for debris: Ensure there are absolutely no lingering pieces of glass or metal inside the socket that could short-circuit a new bulb or create an electrical hazard.
Install a New Bulb
Once you’re confident the socket is clean and undamaged, you can install a new bulb.
- Choose the right wattage: Make sure the new bulb’s wattage does not exceed the maximum rating for your fixture.
- Screw in gently: Screw the new bulb in gently, clockwise, until it’s snug, but *do not overtighten*. Overtightening is a common cause of broken bulbs during removal.
- Restore power: Go back to your electrical panel and flip the circuit breaker back to the “on” position.
- Test the light: Flip the light switch to “on” and enjoy your working light!
Prevention is Key: Avoiding Future Breaks
Knowing how to remove a broken light bulb is valuable, but preventing the break in the first place is even better.
Don’t Overtighten
This is perhaps the most common reason bulbs break when being removed. Screw bulbs in until they are snug, and then give them just a tiny quarter-turn more. Excessive force isn’t needed and puts stress on the glass and the fixture.
Use the Correct Wattage
Always use bulbs that match or are below the maximum wattage specified for your fixture. Overheating from an overpowered bulb can weaken the glass or internal components, making it more prone to breaking.
Handle Bulbs Carefully
When installing or removing bulbs, especially traditional incandescent ones (which are more fragile than LEDs), hold them by the metal base or the sturdy plastic/metal housing. Avoid gripping the delicate glass sphere too tightly.
Regular Maintenance
Periodically inspect your light fixtures for any signs of wear and tear, loose wiring, or corrosion in the socket, which could contribute to bulbs getting stuck or breaking.
Consider LED Bulbs
LED bulbs are generally more durable than traditional incandescent or CFL bulbs. They are often made with plastic diffusers instead of pure glass, making them less prone to shattering. They also last much longer, reducing the frequency of bulb changes.
Conclusion
Encountering a broken light bulb can be a momentarily startling experience, but it doesn’t have to be a major ordeal. By following this comprehensive guide on how to remove a broken light bulb, you’ve equipped yourself with the knowledge and techniques to tackle this common household issue safely and effectively. Remember, patience, proper safety gear, and a methodical approach are your best friends in this situation.
From disconnecting the power to carefully extracting the metal base and cleaning up every last shard, each step is designed to keep you safe and ensure your light fixture is ready for a new bulb. And by adopting a few preventative habits, you can significantly reduce the chances of ever having to deal with a broken bulb again. So, the next time a bulb gives up the ghost in a dramatic fashion, you’ll know exactly how to remove a broken light bulb with confidence and ease. Good luck, and shine on!
Frequently Asked Questions
What kind of gloves should I wear to remove a broken light bulb?
You should wear heavy-duty work gloves, such as thick leather gloves, gardening gloves, or cut-resistant gloves. Standard household rubber gloves are not sufficient as they can easily be punctured by sharp glass shards.
Is it safe to use a screwdriver to remove a broken light bulb?
Using a flathead screwdriver can be safe if done with extreme caution, primarily for catching a lip of the metal base and twisting. However, ensure the power is off, wear protective gear, and avoid touching the center contact point of the socket, as this method carries a higher risk of damaging the socket or causing injury.
How do I know if the light socket is damaged after removing a broken bulb?
After removal, inspect the socket with a flashlight. Look for cracks in the porcelain or plastic, bent or corroded metal tabs, or any exposed wiring. If you notice any of these signs, do not install a new bulb; the socket should be replaced by a qualified electrician.
Can I use super glue to attach something to the broken bulb base for removal?
While some DIYers suggest using super glue to attach a stick or cork, this method is generally not recommended. It can be messy, ineffective if the bond isn’t strong, and risks getting glue into the socket’s threads, potentially damaging it permanently.
What if I can’t reach the broken light bulb safely?
If the broken bulb is in a high or hard-to-reach fixture, do not attempt to reach it from an unstable surface. Use a sturdy ladder or step stool, ensuring it’s on a level surface. If you still cannot safely reach or feel comfortable, it’s best to call a professional handyman or electrician.
How should I dispose of the broken glass from a light bulb?
Gather all broken glass fragments and the removed metal base into a sturdy container that won’t easily be punctured, such as a thick plastic bottle or a reinforced cardboard box. Seal it, label it clearly as “BROKEN GLASS” to alert sanitation workers, and dispose of it according to your local waste disposal guidelines for sharp objects.